25 Unique Watercolour Painting Techniques
Mastering the Art of Watercolour: A Journey Through Various Techniques
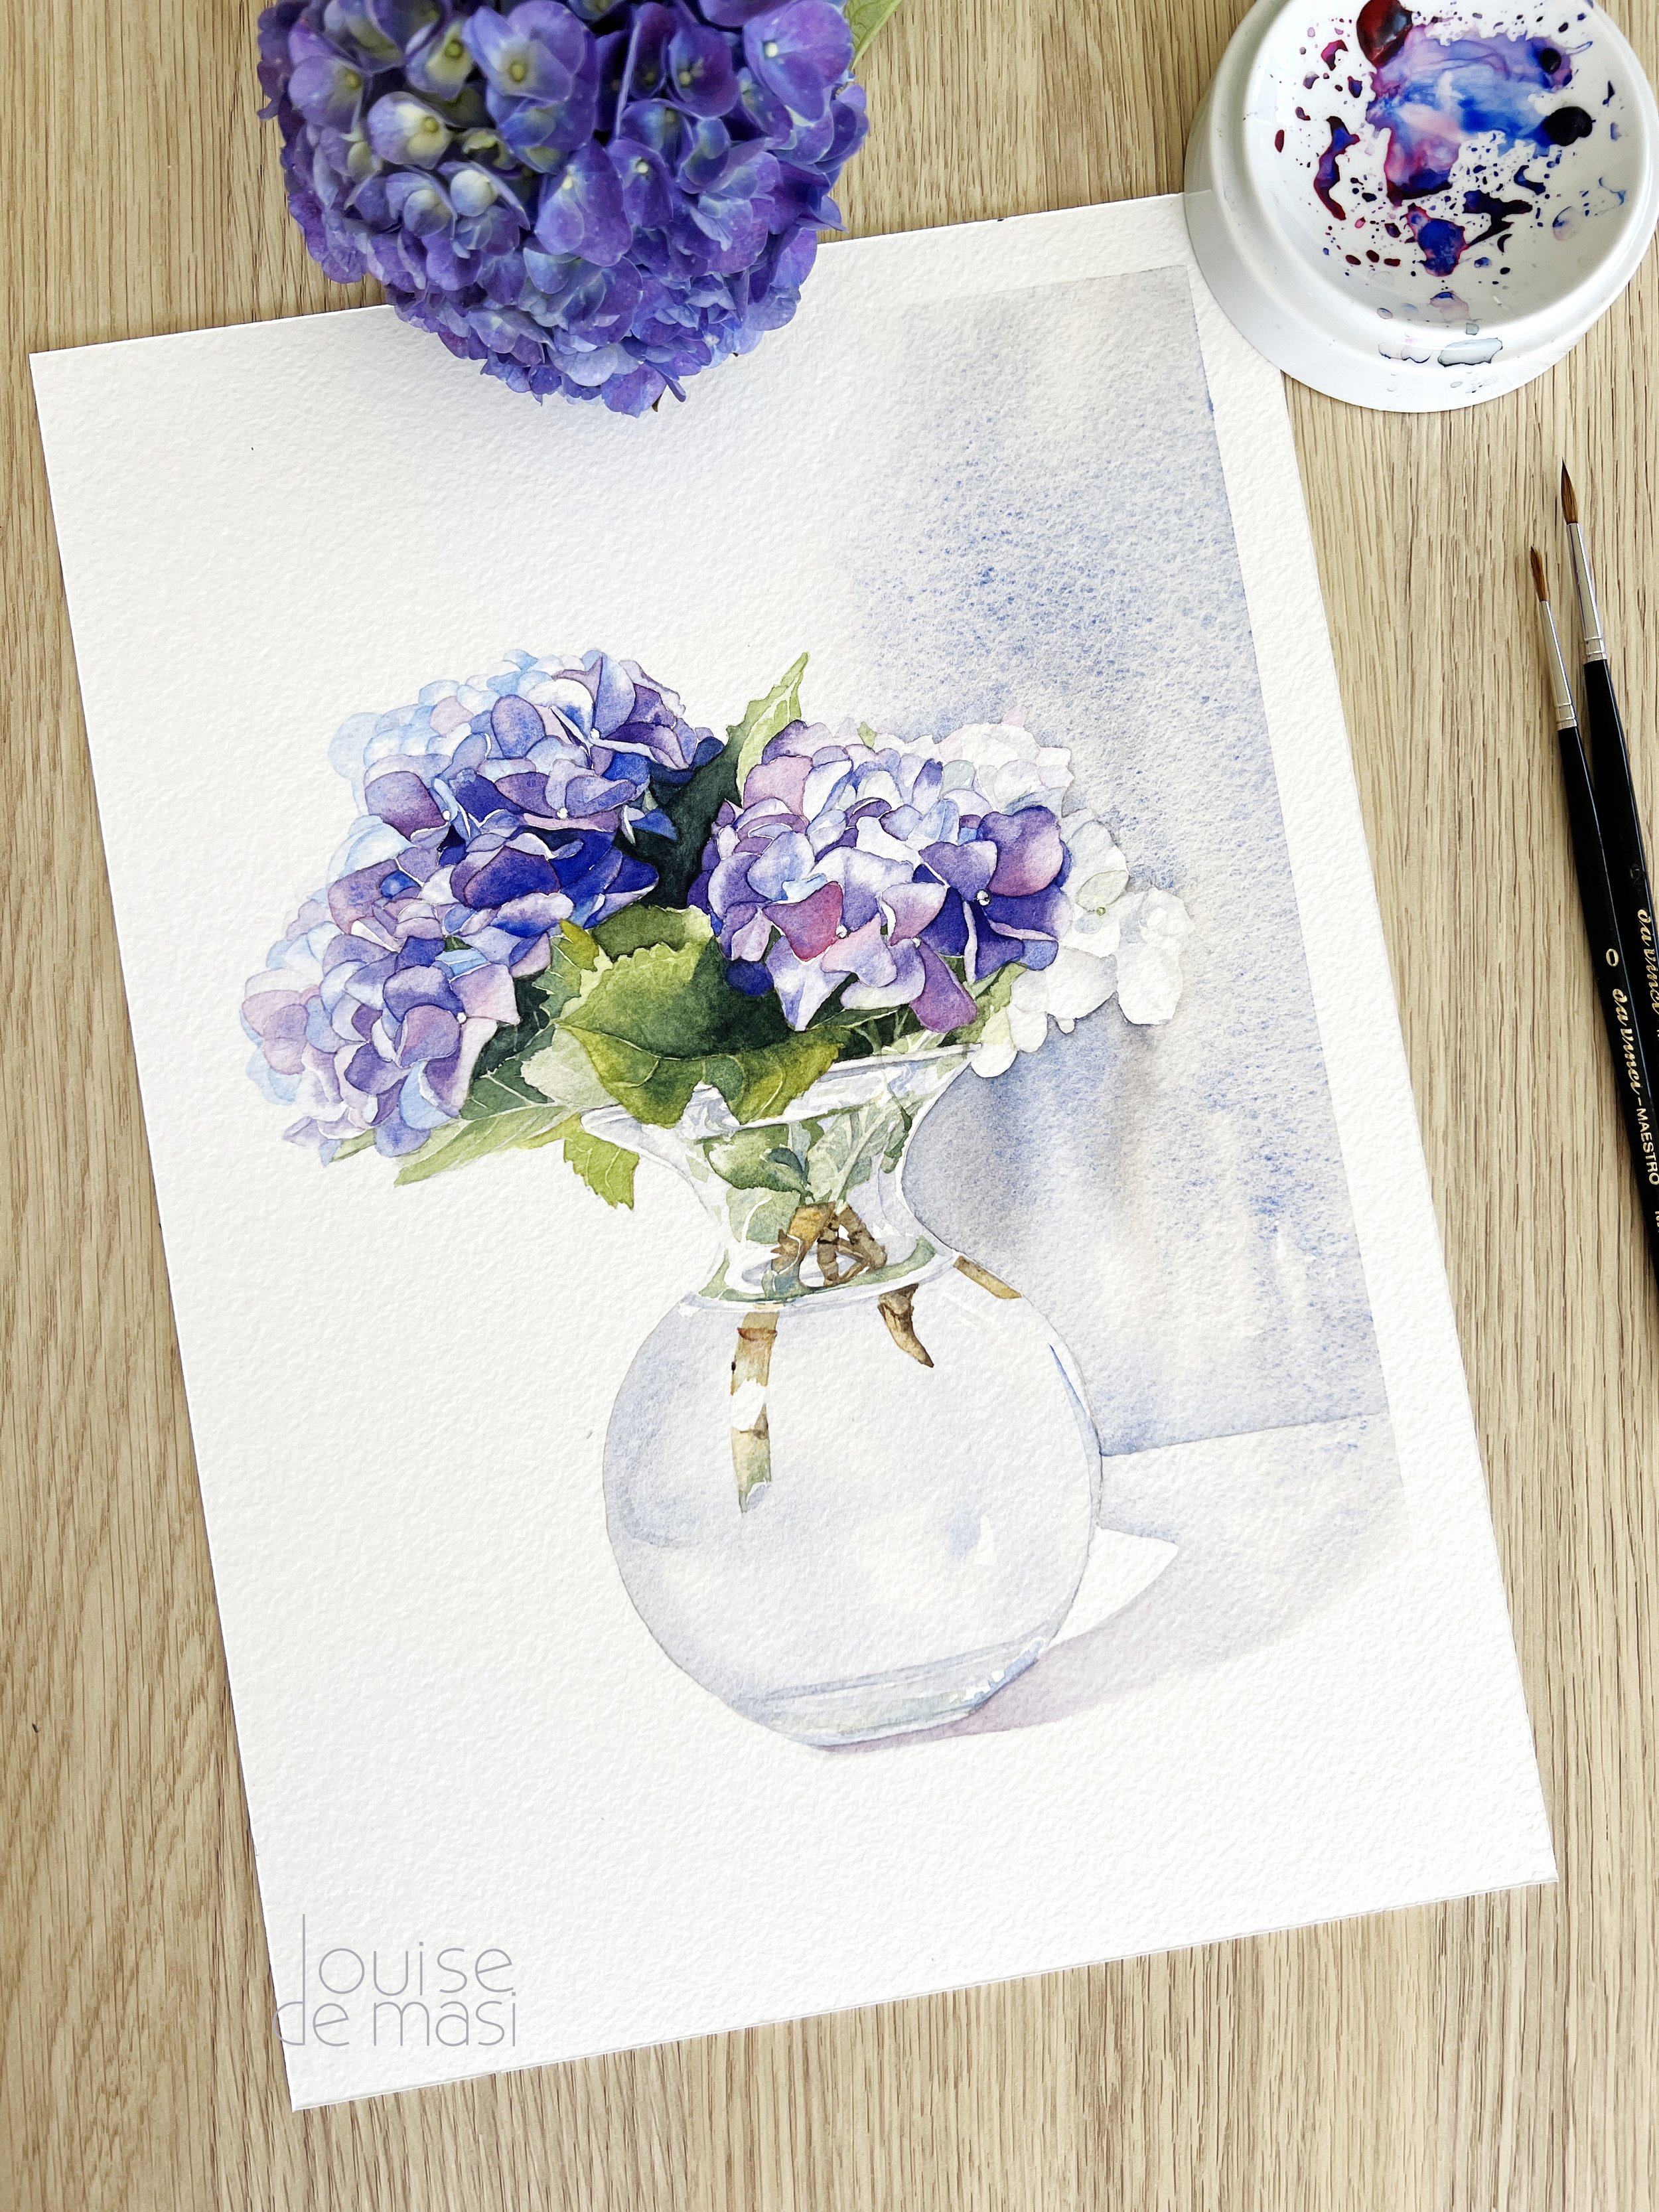
Hello, my fellow watercolour enthusiasts!
I invite you to dive deep with me into the enchanting world of watercolour techniques. Whether you're just starting out or have been splashing around for years, there's always something new to discover with this wonderfully unpredictable medium.
From the gentle caress of a wet-on-wet wash to the crisp precision of a dry brushstroke, each technique offers its own unique charm and challenge. I will be talking about basic watercolour painting techniques, as well as techniques, that might be unknown to even the more versed amongst you.
So, let's roll up our sleeves, wet our brushes, and embark on this colourful adventure together!
1. Wet-on-Wet: Embracing the Flow
The wet-on-wet technique is all about letting go and embracing the unpredictability of watercolour. Start by thoroughly wetting your paper with clean water. Next, load your brush with pigment and apply it to the wet surface. Watch as the colours blend and flow into each other on the wet paper, creating soft, organic transitions.
This technique is perfect for painting dreamy skies, misty landscapes, and soft backgrounds where you want the colours to meld seamlessly. It's like watching magic unfold on your paper, as the water guides the paint in beautiful, unexpected ways.
The wet on wet technique is what makes watercolour such a joy to use.
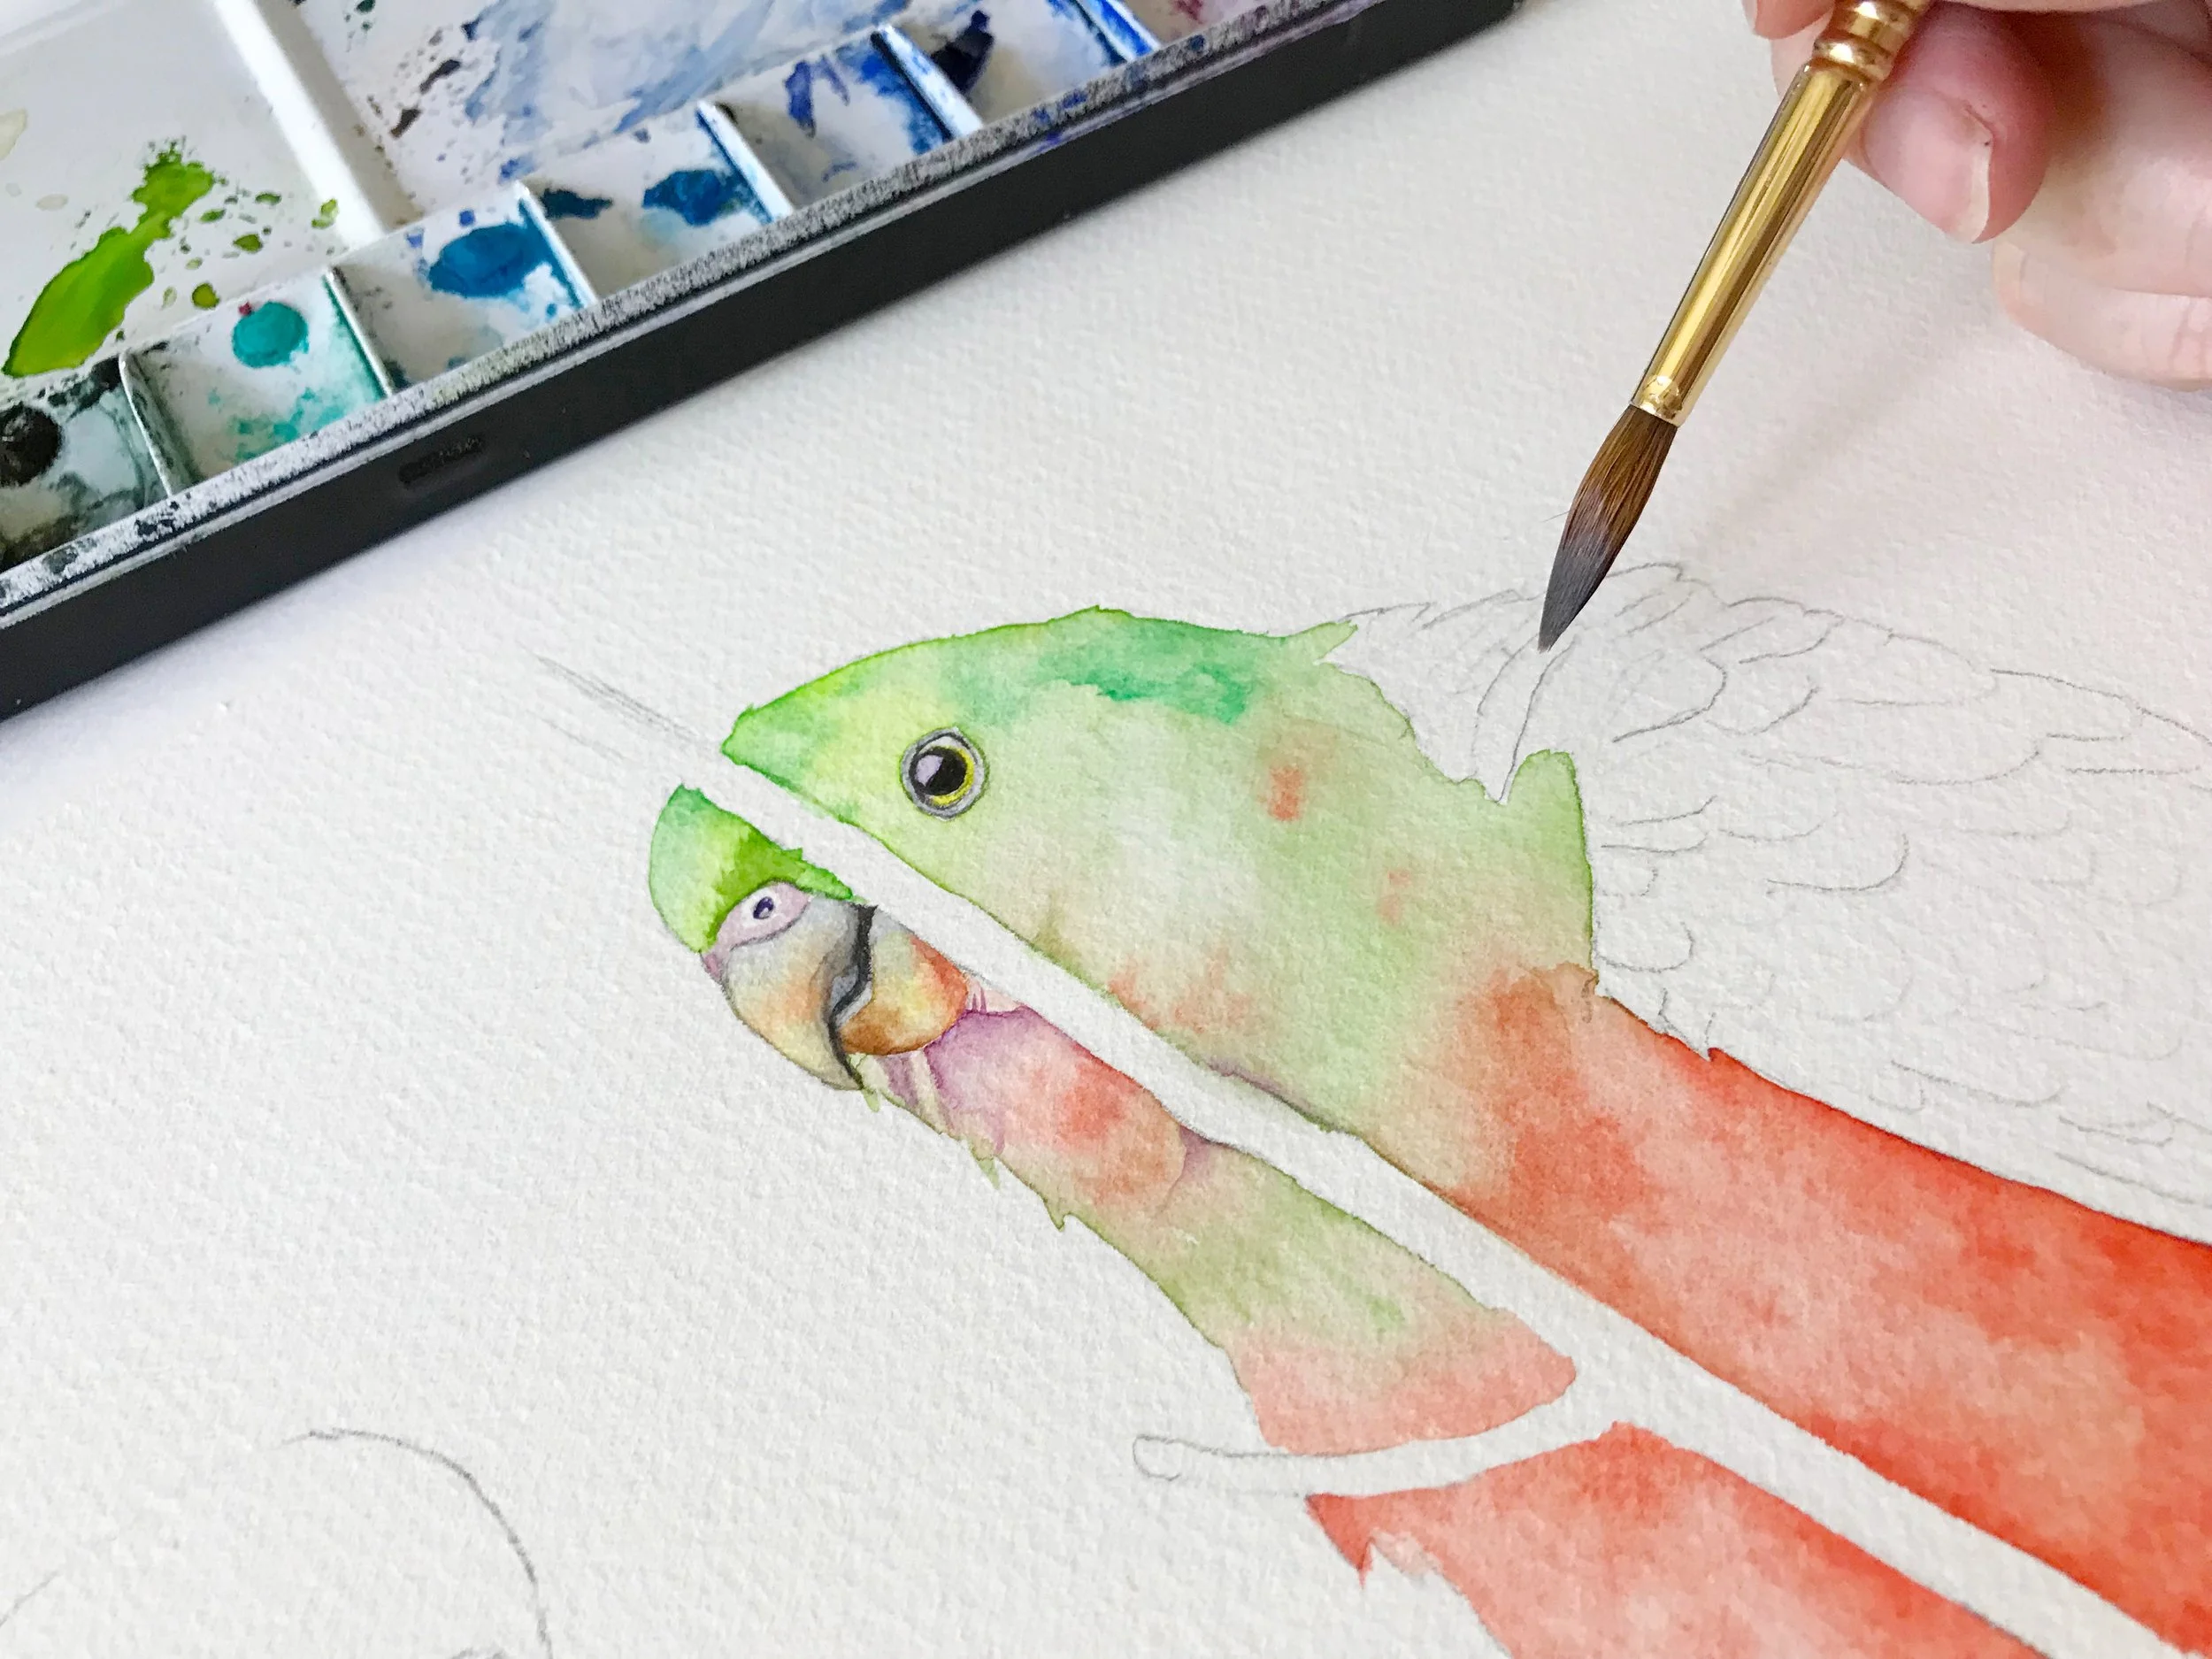
2. Wet-on-Dry: Precision and Control
For more control and defined edges, the wet-on-dry technique is your best friend. Use a wet brush loaded with pigment on dry paper. Applying your watercolour paint onto dry paper allows you to create crisp lines and detailed work. This method is ideal for intricate subjects like botanical illustrations, architectural details, and precise patterns. You can build up layers of colour without the fear of colours bleeding into each other, making it easier to create detailed and controlled artworks. It's like drawing with a fine-tip pen but with the added beauty of watercolour's translucency. Have a paper towel ready to adjust the wetness of your paint. Image below left.

Wet on dry simply means using wet paint on dry paper.
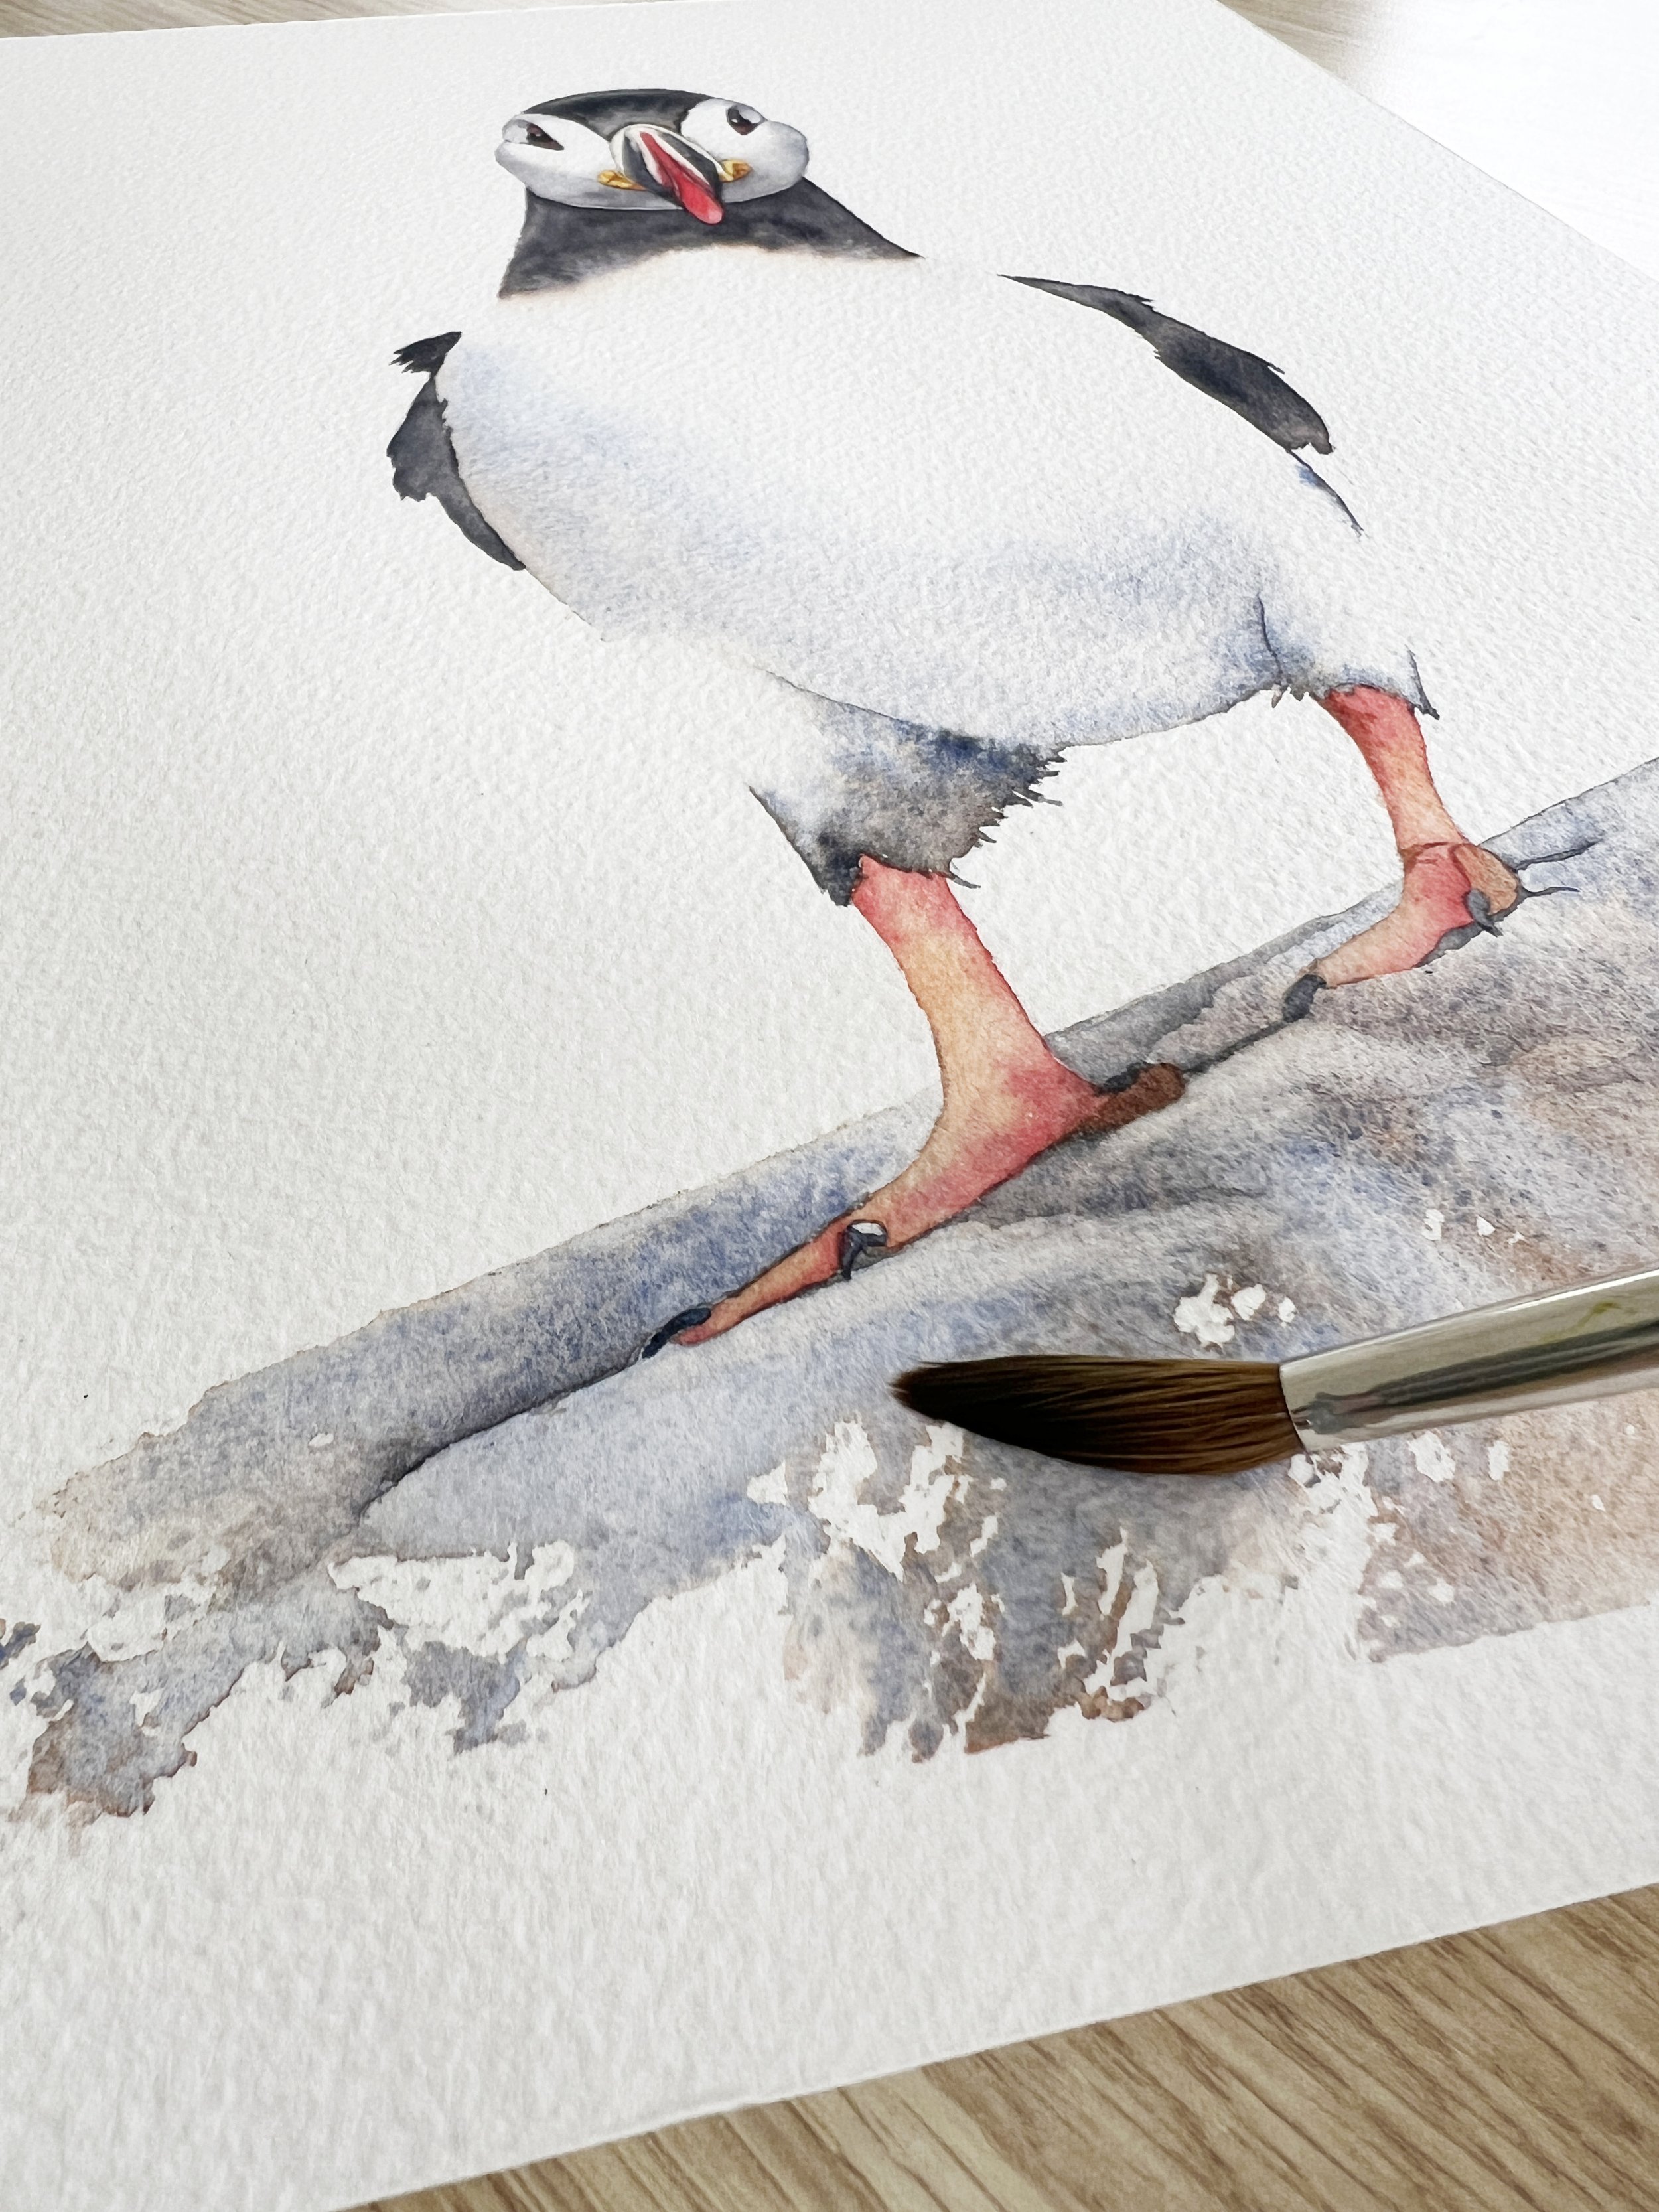
I used the dry brush technique to paint the rock that this Puffin is standing on.
3. Dry Brush: Adding Texture
To create texture and depth, try the dry brush technique. Load your brush with paint and drag the side of the bristles across the paper, it will leave behind a textured, broken line. This technique is fantastic for depicting rough surfaces, fur, and grassy landscapes.
The texture created by the dry brush adds a tactile quality to your paintings, making them feel more alive and dynamic. It's especially useful for adding the appearance of age or wear to objects in your painting. Image above right.
4. Glazing: Building Layers of Colour
Glazing involves applying thin, transparent washes of colour over a dry layer of paint. Each layer adds depth and richness to your painting, allowing you to achieve luminous effects. Be patient and let each layer and underlying wash dry completely before adding the next.
This technique is excellent for building up shadows, darker tone of a colour, adding depth, and creating complex colour compositions. Glazing can transform a flat painting into one with rich, glowing depth, as each layer subtly influences the ones beneath it.

Here I'm glazing colour over the previous layer of paint that has dried. I wanted the petal to appear darker and more luminous.
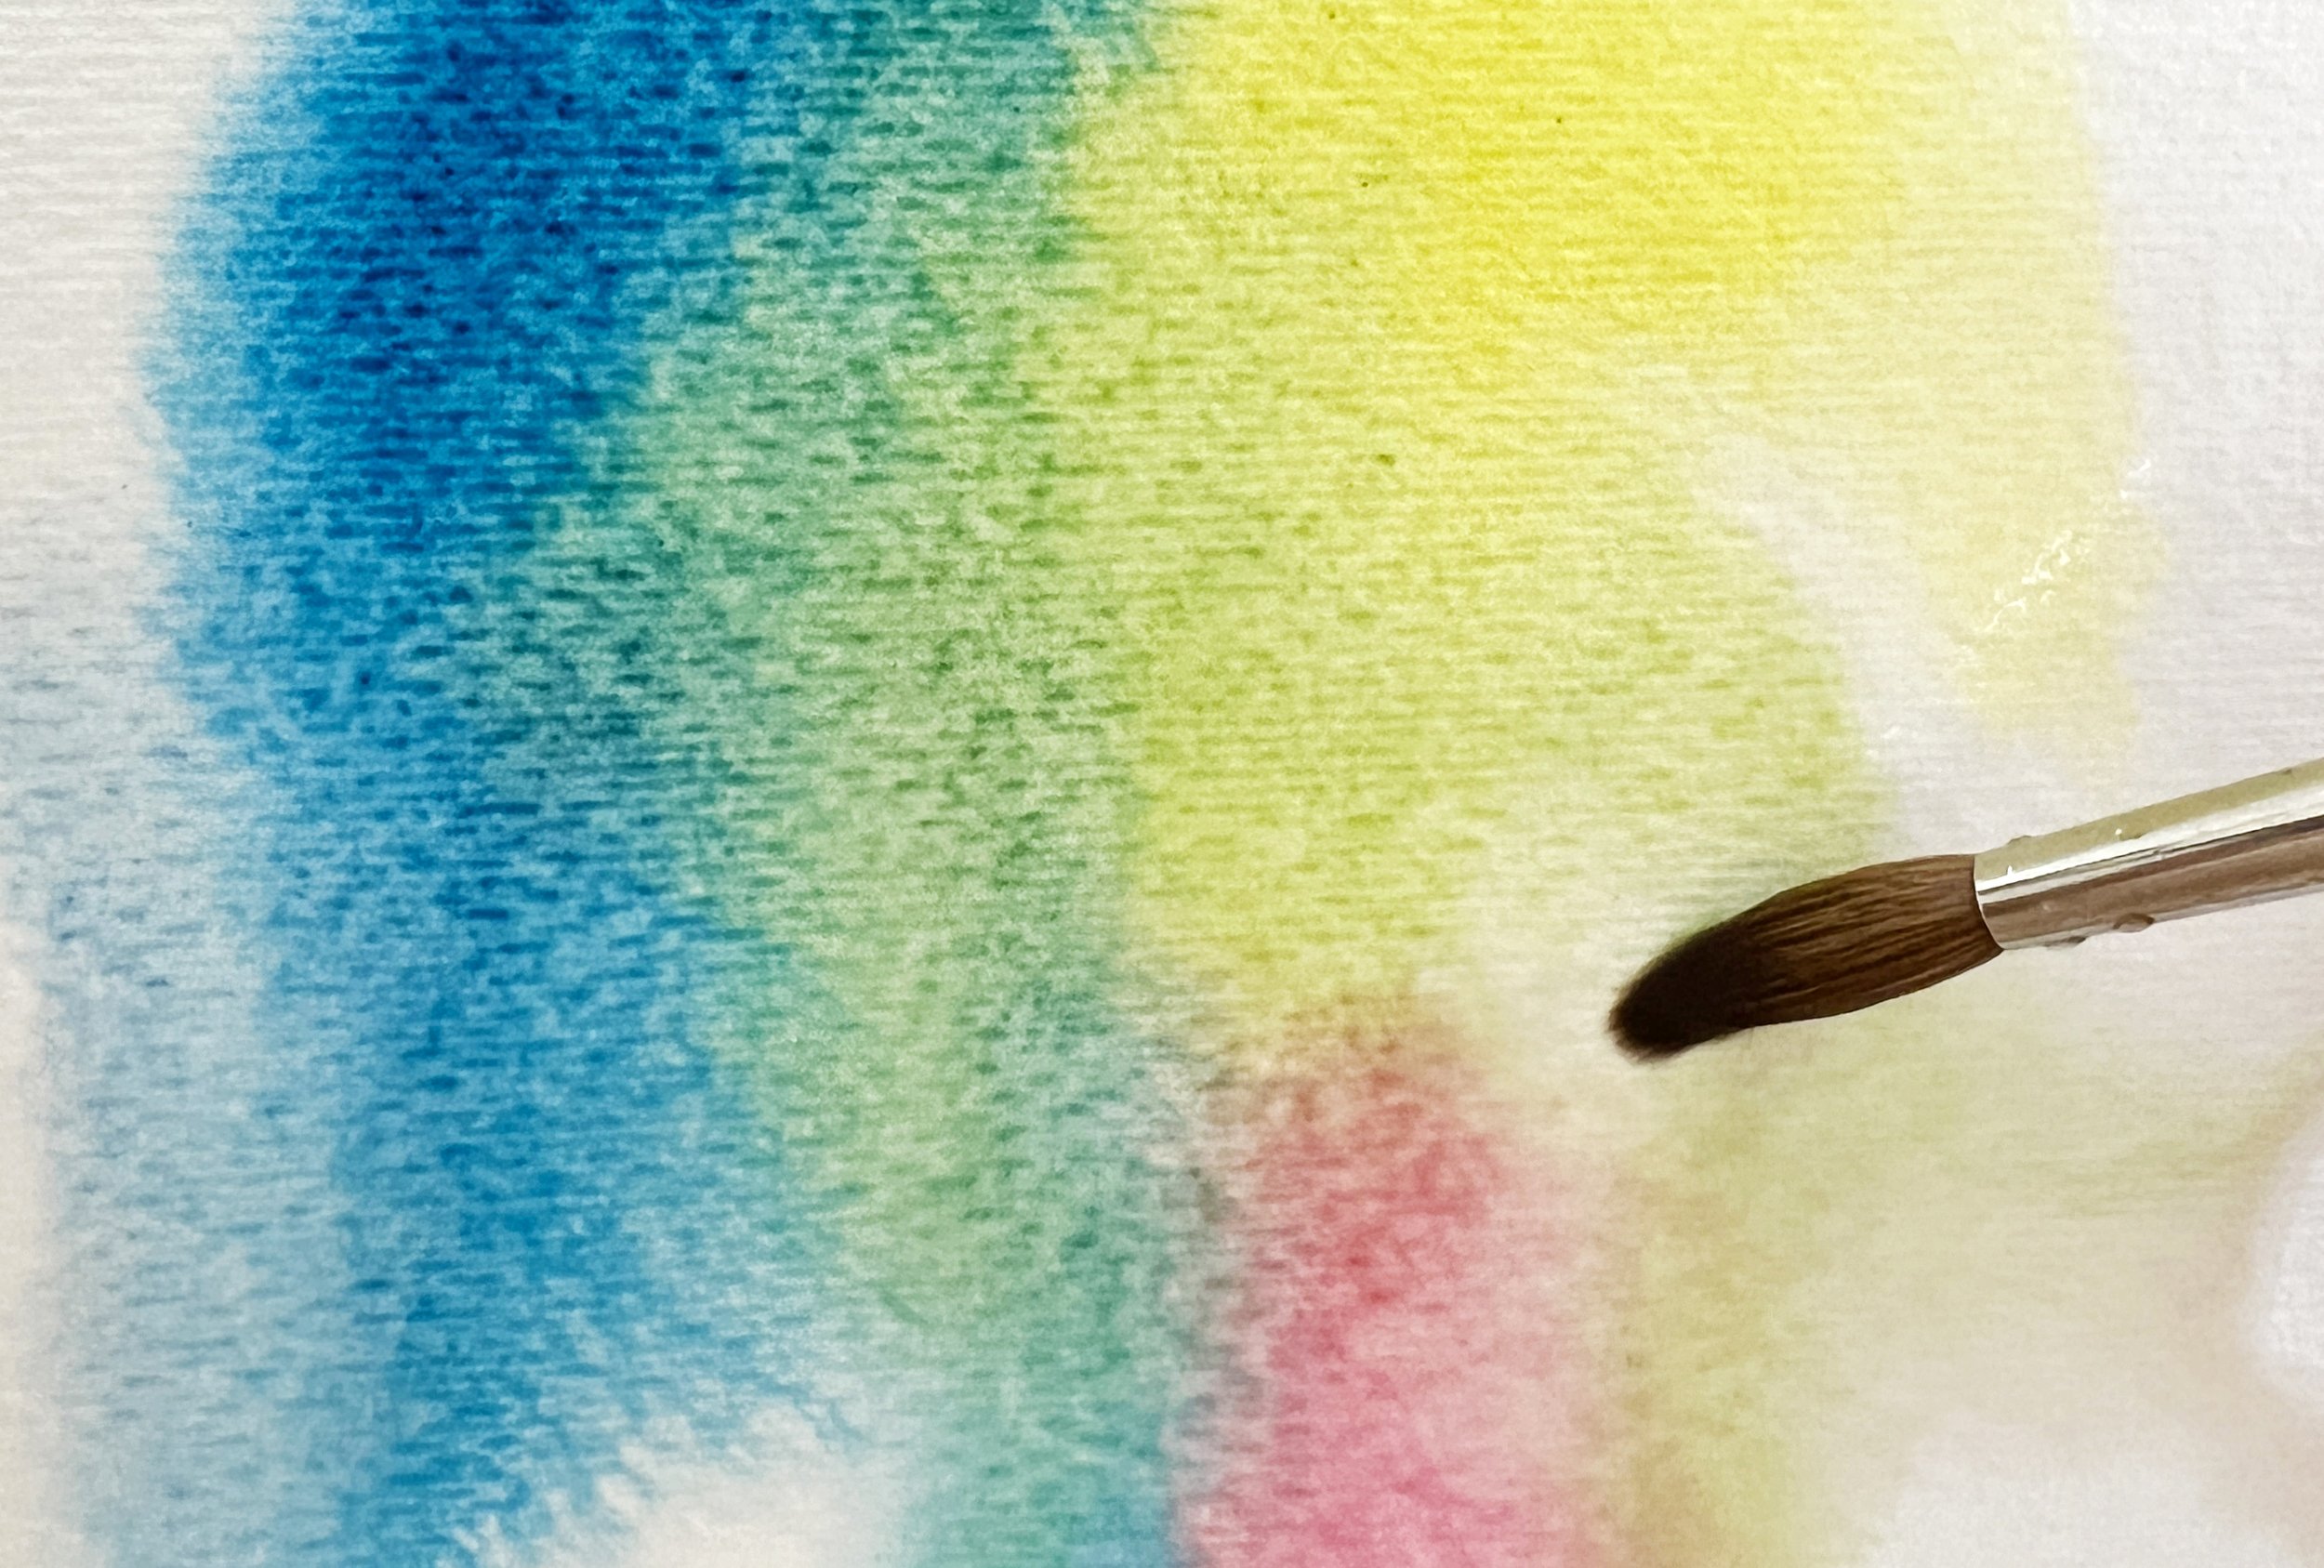
5. Creating Various Watercolour Washes
Watercolour washes are fundamental to building your paintings. A flat watercolour wash involves applying a consistent layer of colour across the paper. This technique is perfect for skies and large areas of colour. You may use any brush to create a flat wash, however I find it easiest, if you use larger brush sizes.
A Graded Wash starts dark and lightens as you add more water to your brush and move across or down the paper.
To create a gradient or graded wash, start with a saturated colour and gradually add more water as you move down the paper, allowing the colour to fade smoothly, which will result in a natural gradient.
A Variegated wash blends two or more colours together, creating beautiful, multicoloured backgrounds. By mastering these basic washes, you can create stunning effects that serve as the foundation for more complex compositions.
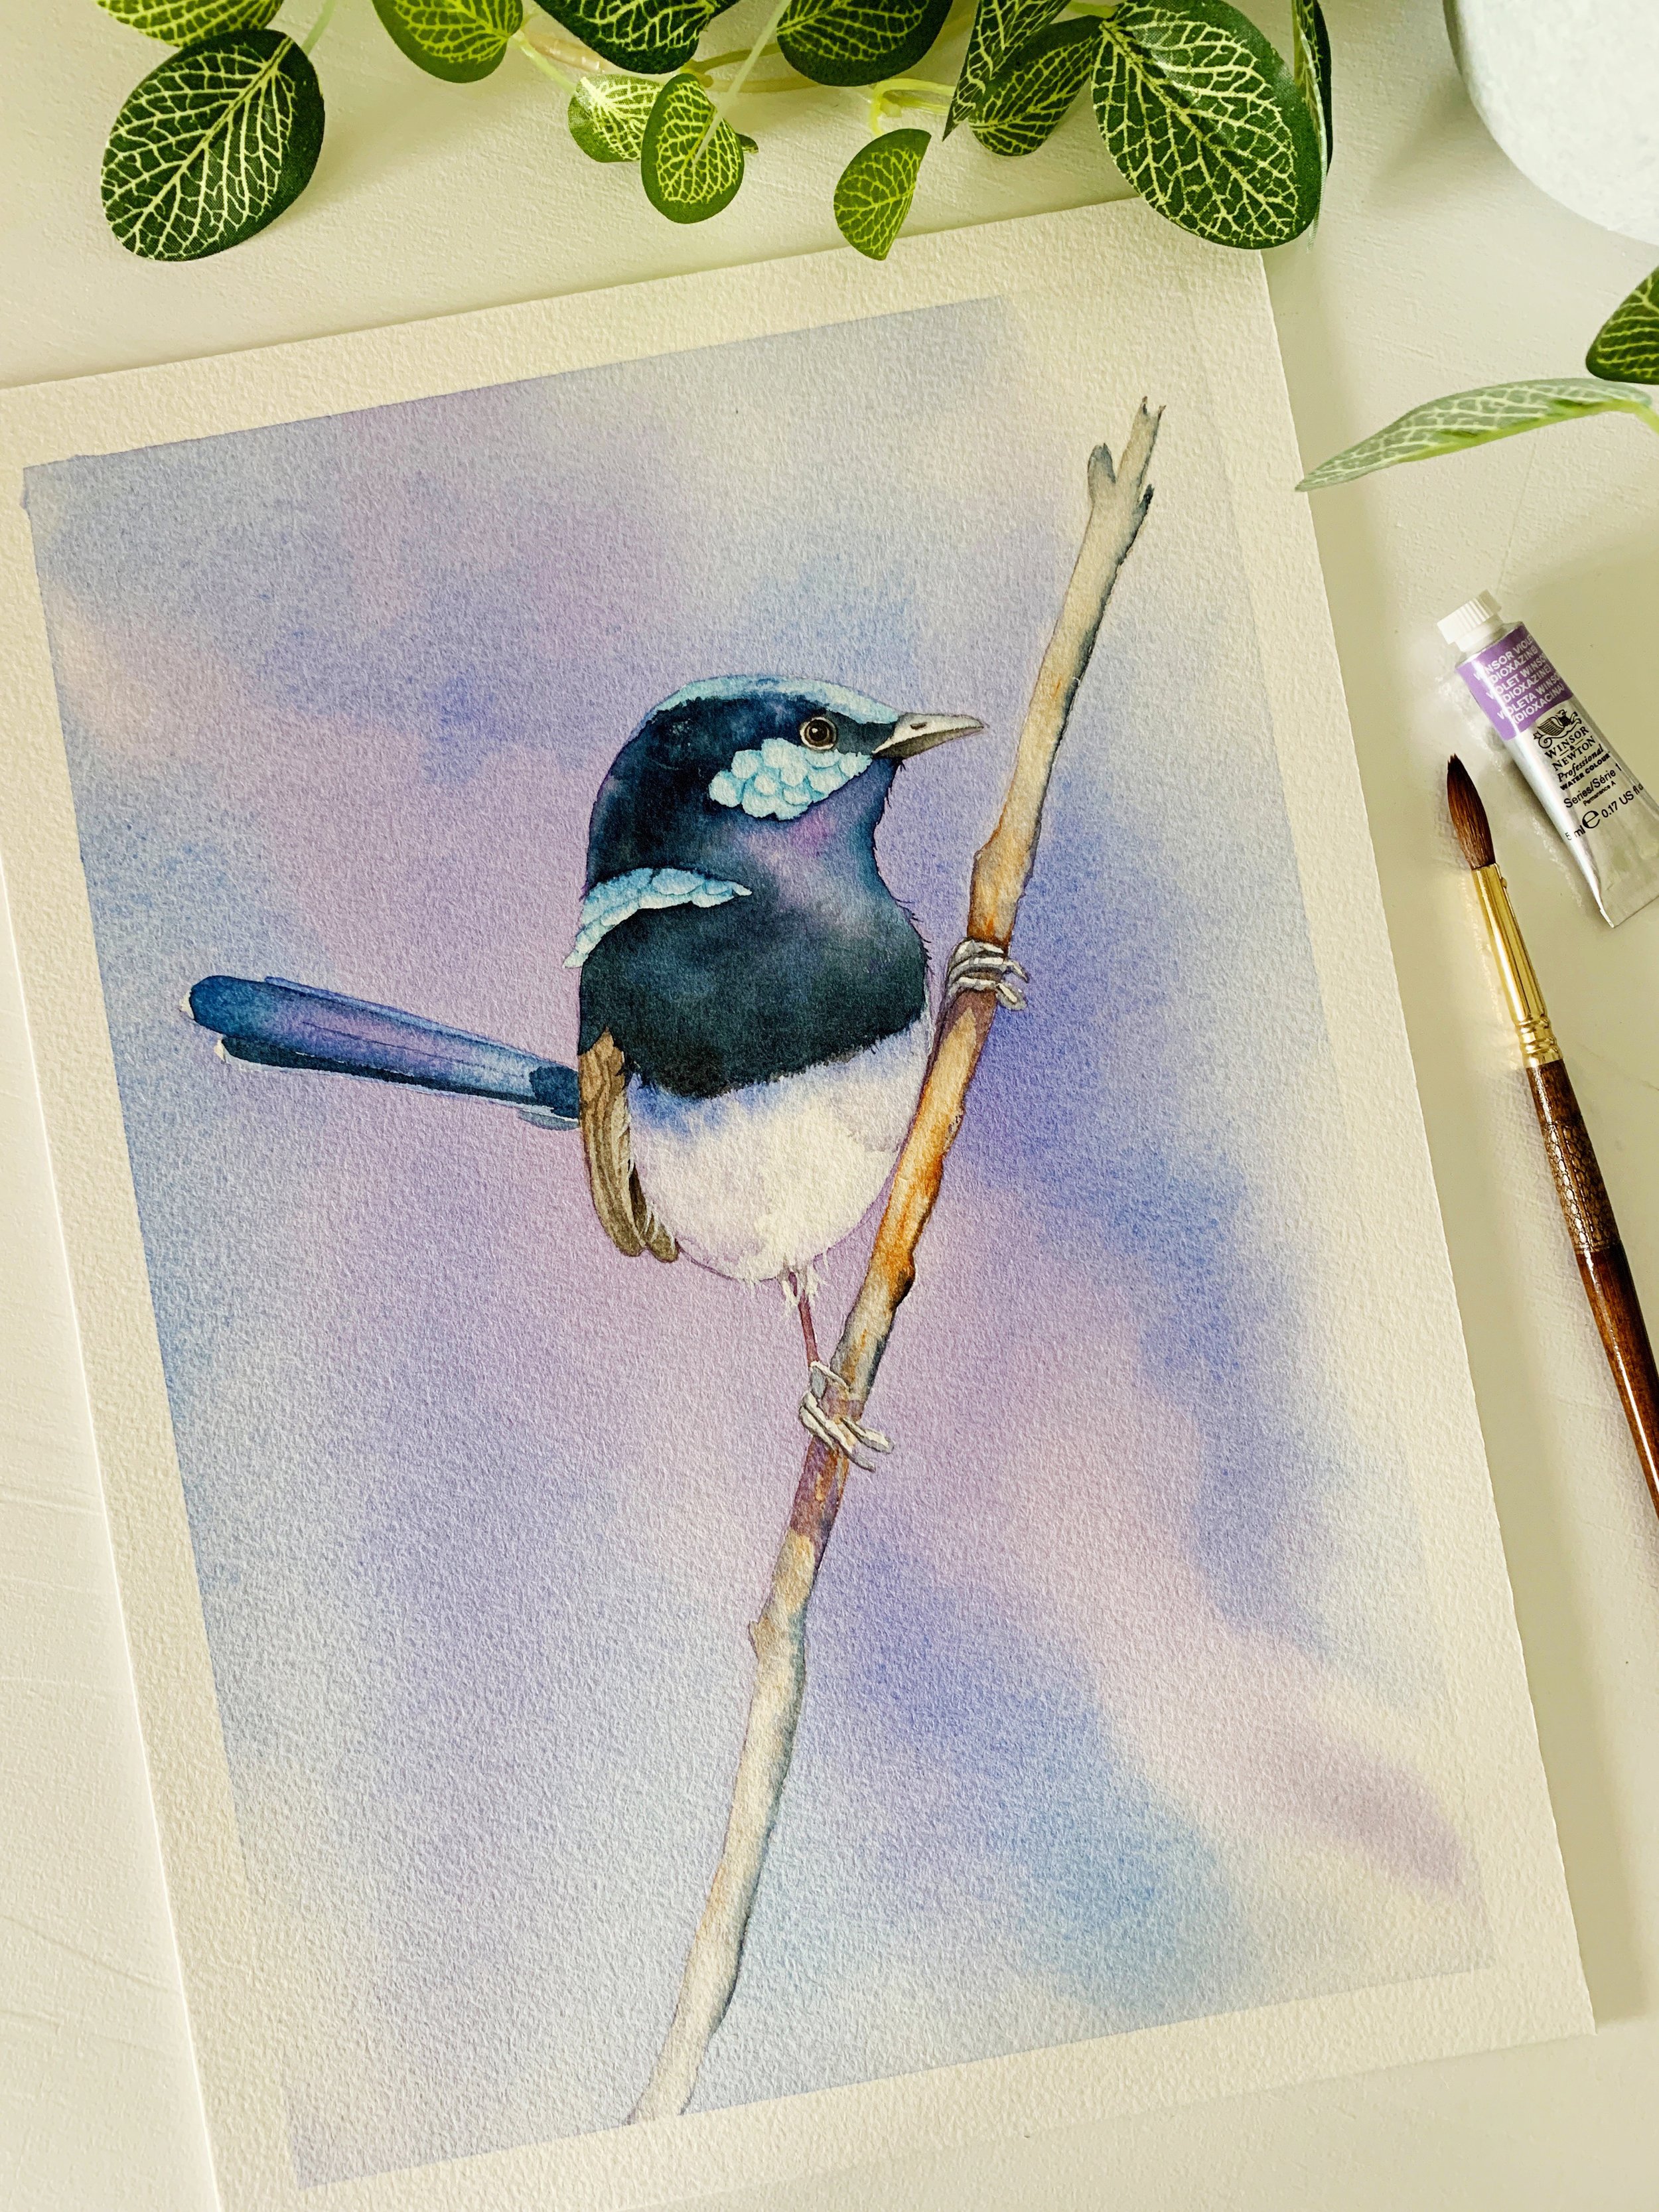
I painted a variegated wash behind this Fairy Wren.
6. Lifting Off: Highlighting and Correcting
Made a mistake or want to add highlights? The lifting technique comes to the rescue. Use a damp, clean round brush, a tissue or paper towel to gently lift wet pigment from the paper. This method can create soft highlights, correct errors, or add texture.
It's particularly useful for creating clouds, light reflections, and subtle details. Lifting off can also help soften hard edges or lighten areas that have become too dark. It’s like having an eraser for your watercolour, giving you a second chance to perfect your work.
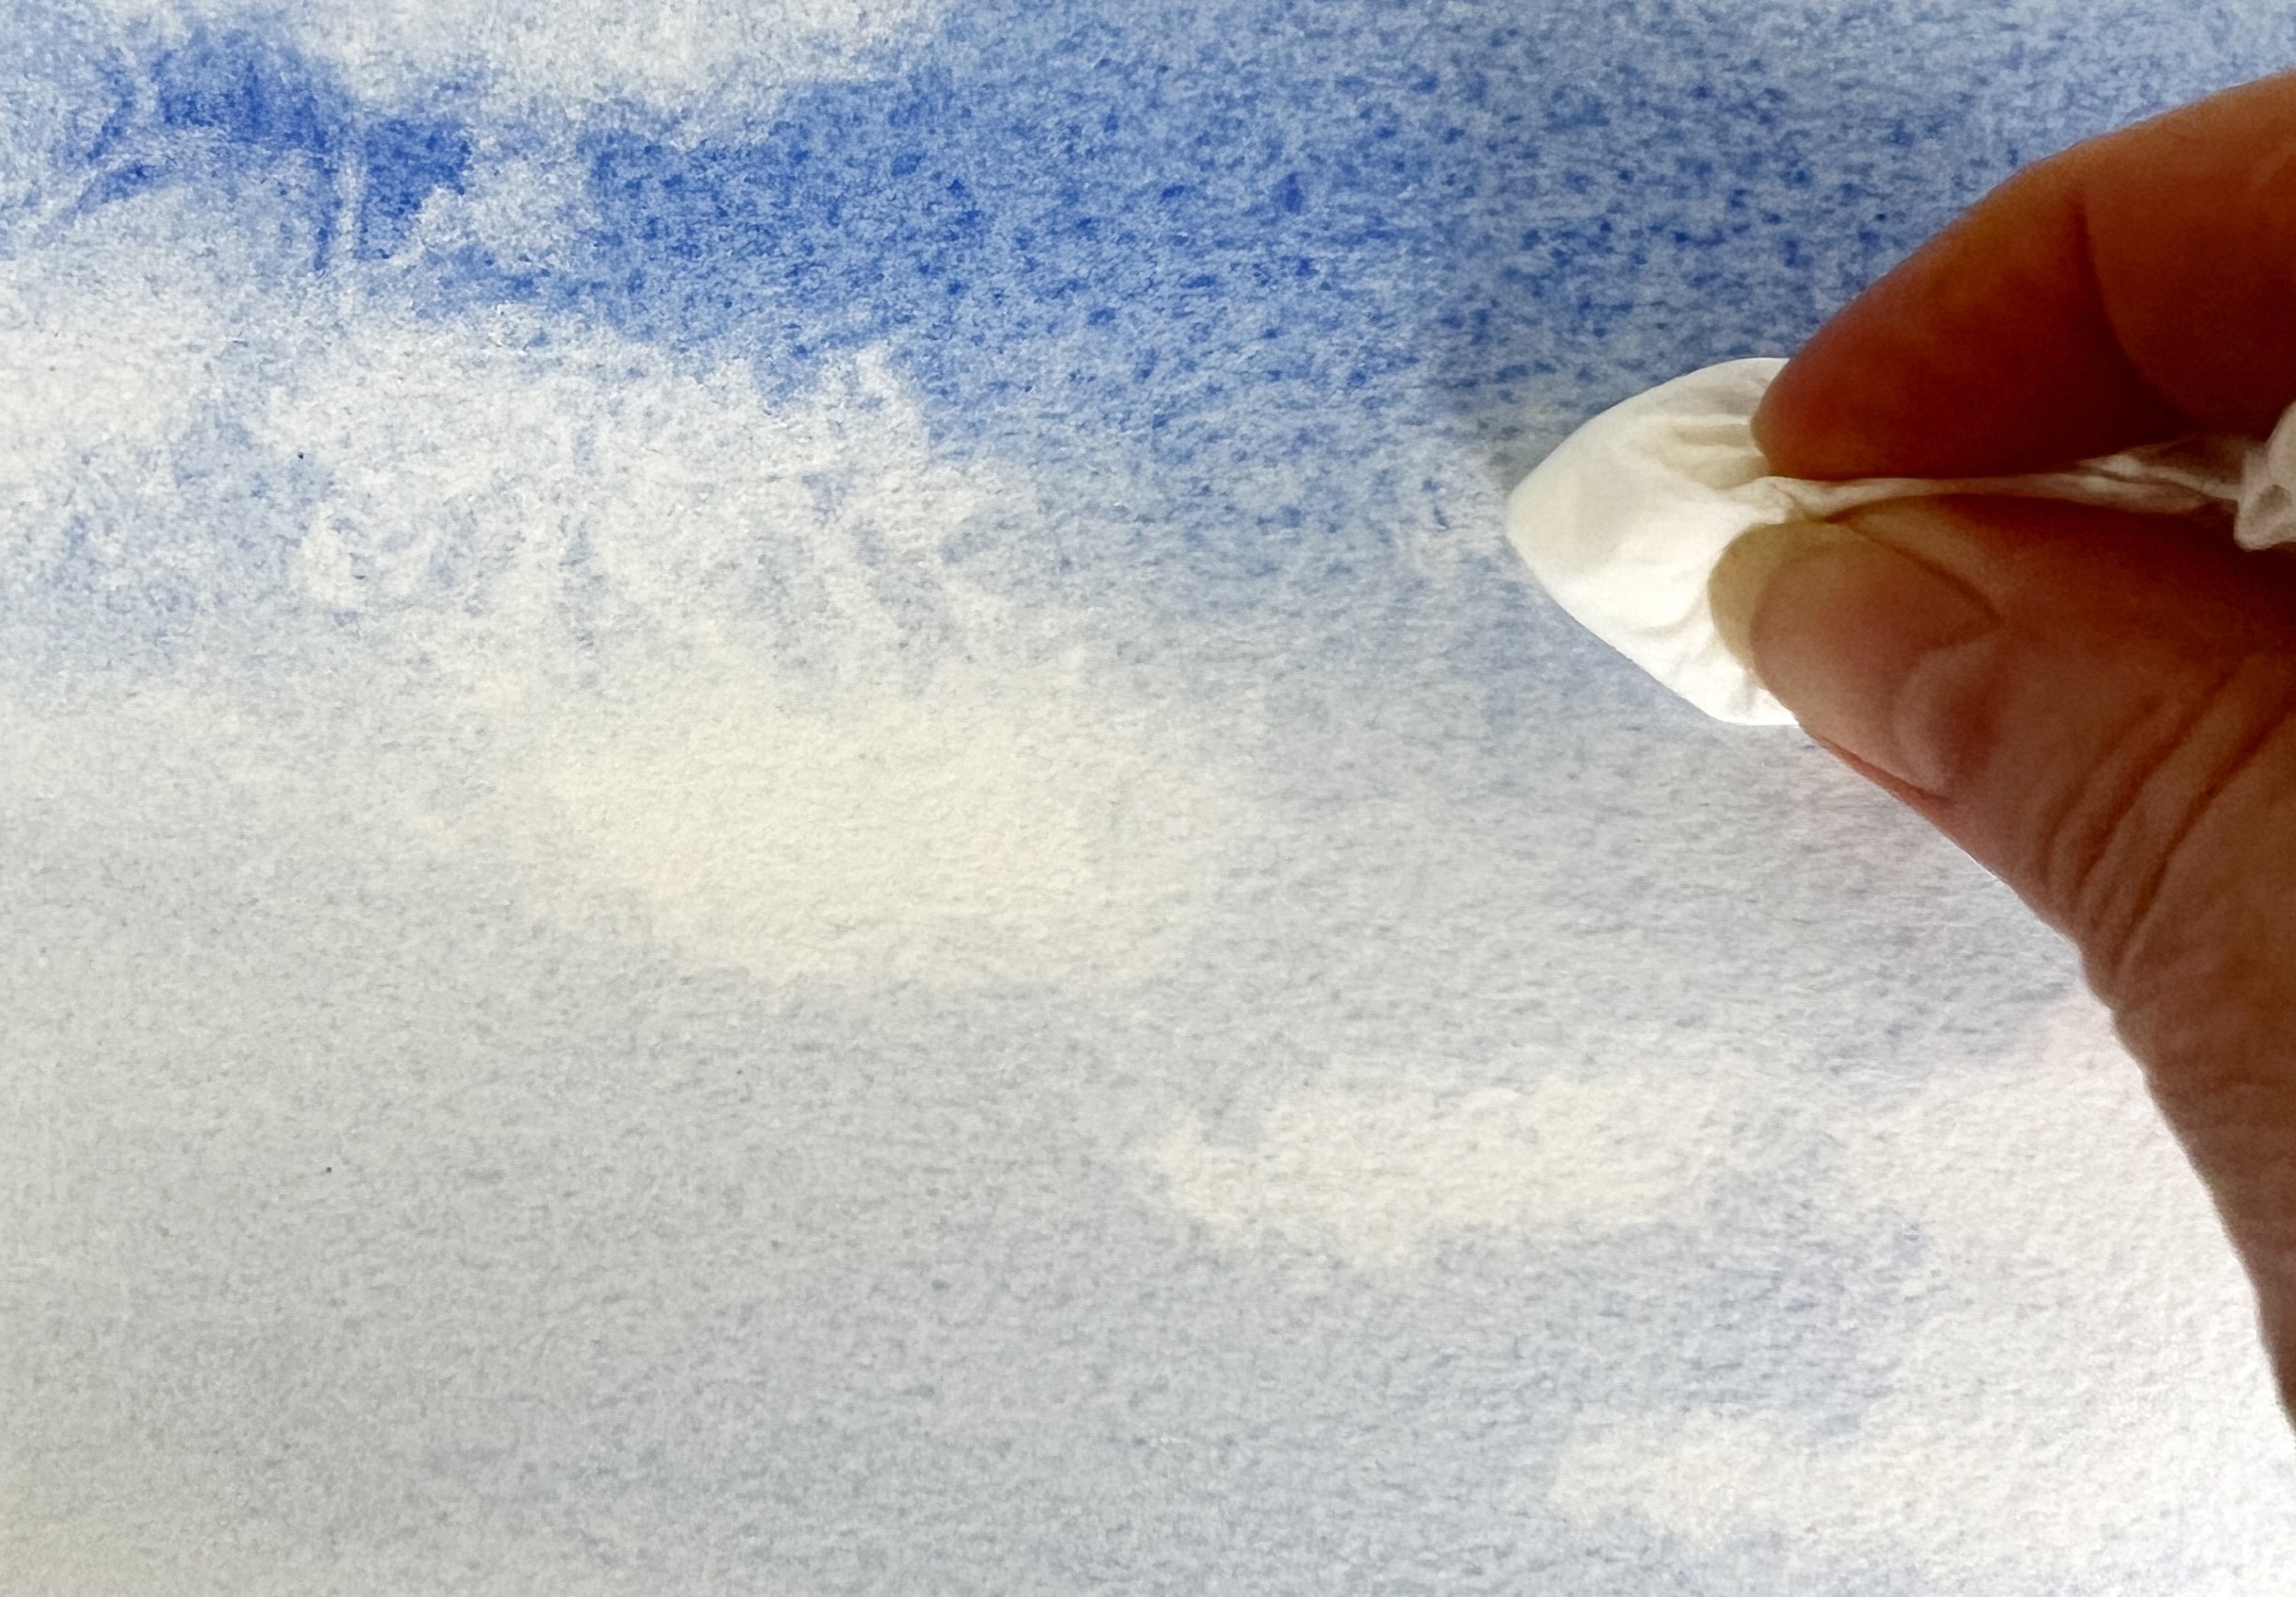
Lifting wet paint with a tissue.
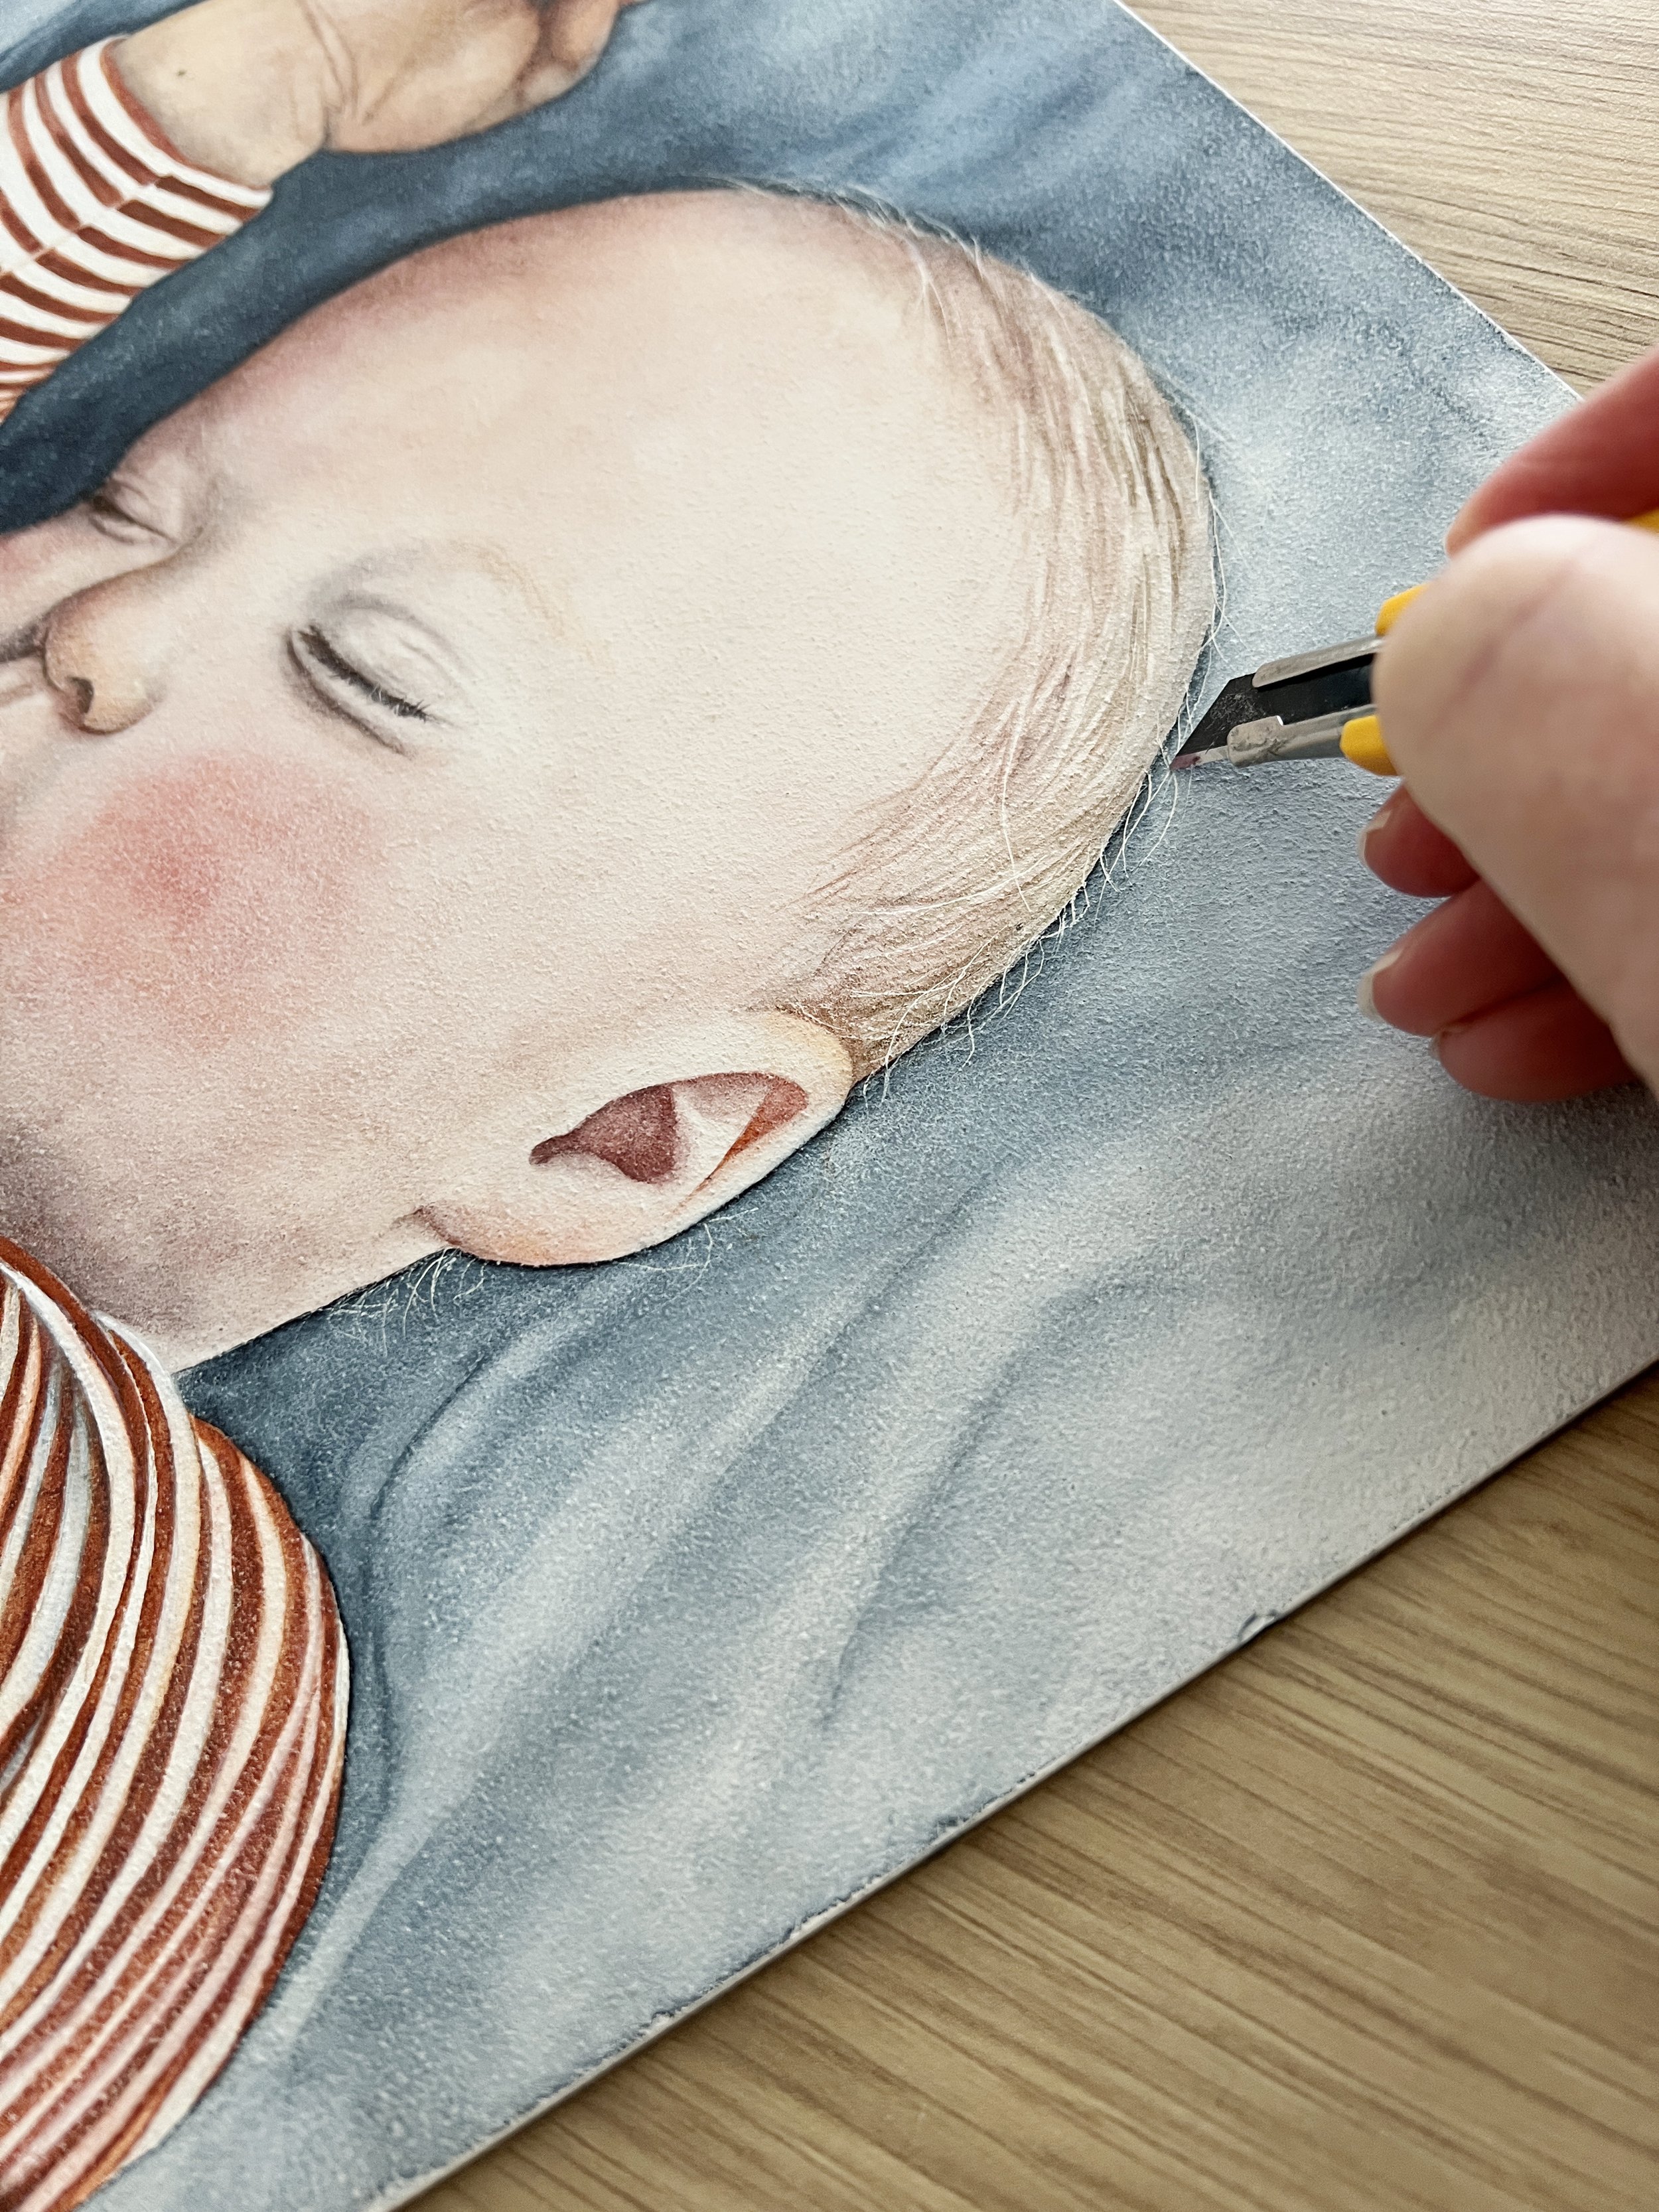
7. Masking: Preserving White Spaces
Masking fluid or tape is a valuable tool for protecting the untouched white paper you want to keep white. Apply the masking fluid or tape before you start painting, wait until completely dry, paint over it, then remove it once your paint is dry. This technique allows you to create crisp, white highlights and intricate patterns without worrying about keeping those areas untouched by paint. Masking is especially handy for preserving the white of the paper for highlights or creating detailed patterns that need to remain unpainted until the final reveal.

Winsor & Newton Masking Fluid and a ruling pen

I used masking fluid to create the hair around the edges of this Westie.
8. Spattering: Adding Dynamic Speckles
For a touch of spontaneity, try spattering. Load your soft or bristle brush with paint and flick it onto the paper to create a speckled effect. This splatter technique is perfect for adding texture to foliage, starry skies, and abstract backgrounds. Experiment with different brush sizes and colours for varied results of splatter. A paper towel can protect certain areas of your work that you don't want splatter on. Spattering can bring a sense of movement and energy to your work, making it feel more dynamic and lively. It's also a very fun technique!
9. Salt Texture: Magical Crystal Effects

I used salt on the fresh paint to create texture on the feathers of these Magpies.
Sprinkling salt on wet paint creates a beautiful, crystallised texture as the salt absorbs the moisture and pigment. This technique works wonderfully for adding interest to backgrounds, creating snow-like textures, and enhancing abstract compositions.
Be sure to let the paint dry completely before brushing off the salt. The salt technique adds a bit of unpredictability and magic to your painting, with each grain of salt leaving its unique mark.
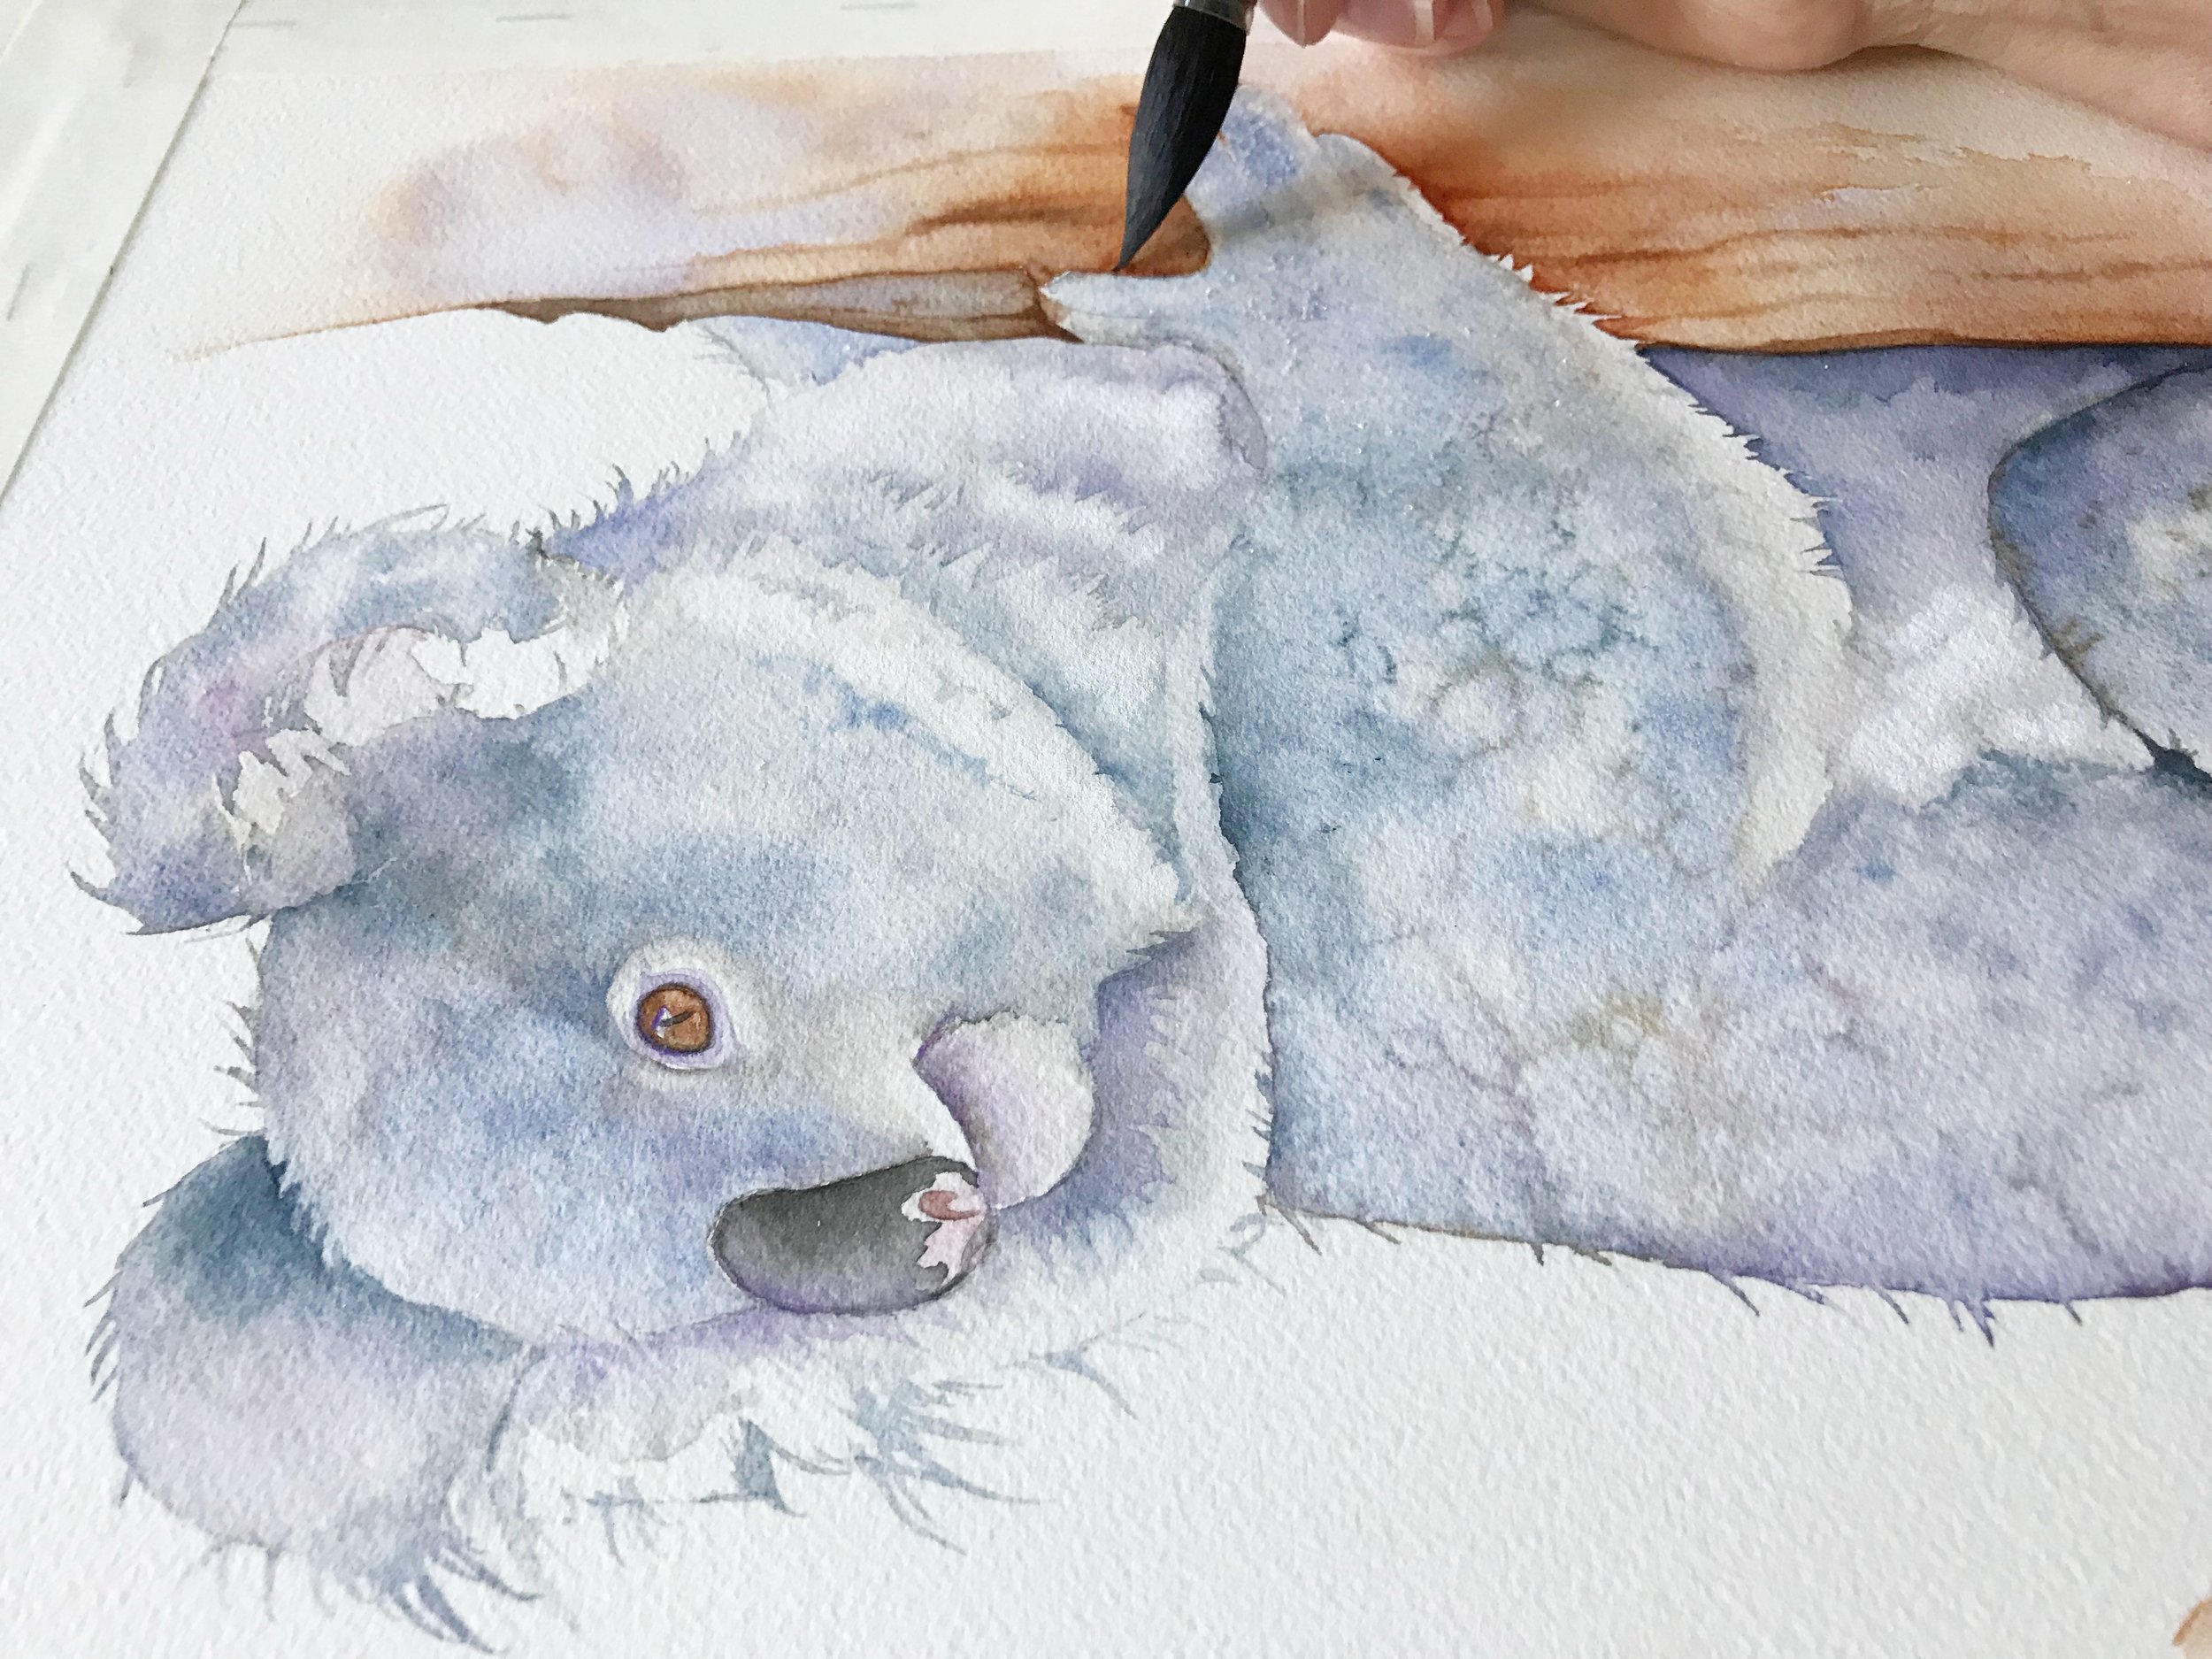
Using salt to create texture on the fur of this Koala.
10. Blooms/Backruns: Organic Shapes
Watercolour blooms or backruns occur when a drop of water or paint is added to a wet area, pushing the pigment around and creating unique, organic shapes. While often considered a mistake, blooms can add character and interest to your paintings.
Instead of hating them, embrace them as happy accidents and incorporate them into your work. These unexpected shapes can add a natural, fluid quality to your art, reminiscent of the way colours flow in nature.

Watercolour blooms are beautiful! They add texture and interest to your paintings.
11. Scumbling: Broken Textures
Scumbling involves using a dry brush to scrub paint onto the paper, creating a broken, textured effect. This technique is great for adding depth to landscapes, creating rough textures, and enhancing the realism of your paintings. Experiment with different brush sizes and angles for varied effects. Scumbling can create the illusion of intricate details and textures without the need for painstaking precision.

I like to use Smooshing brushes dry- with dry paint to scumble texture.
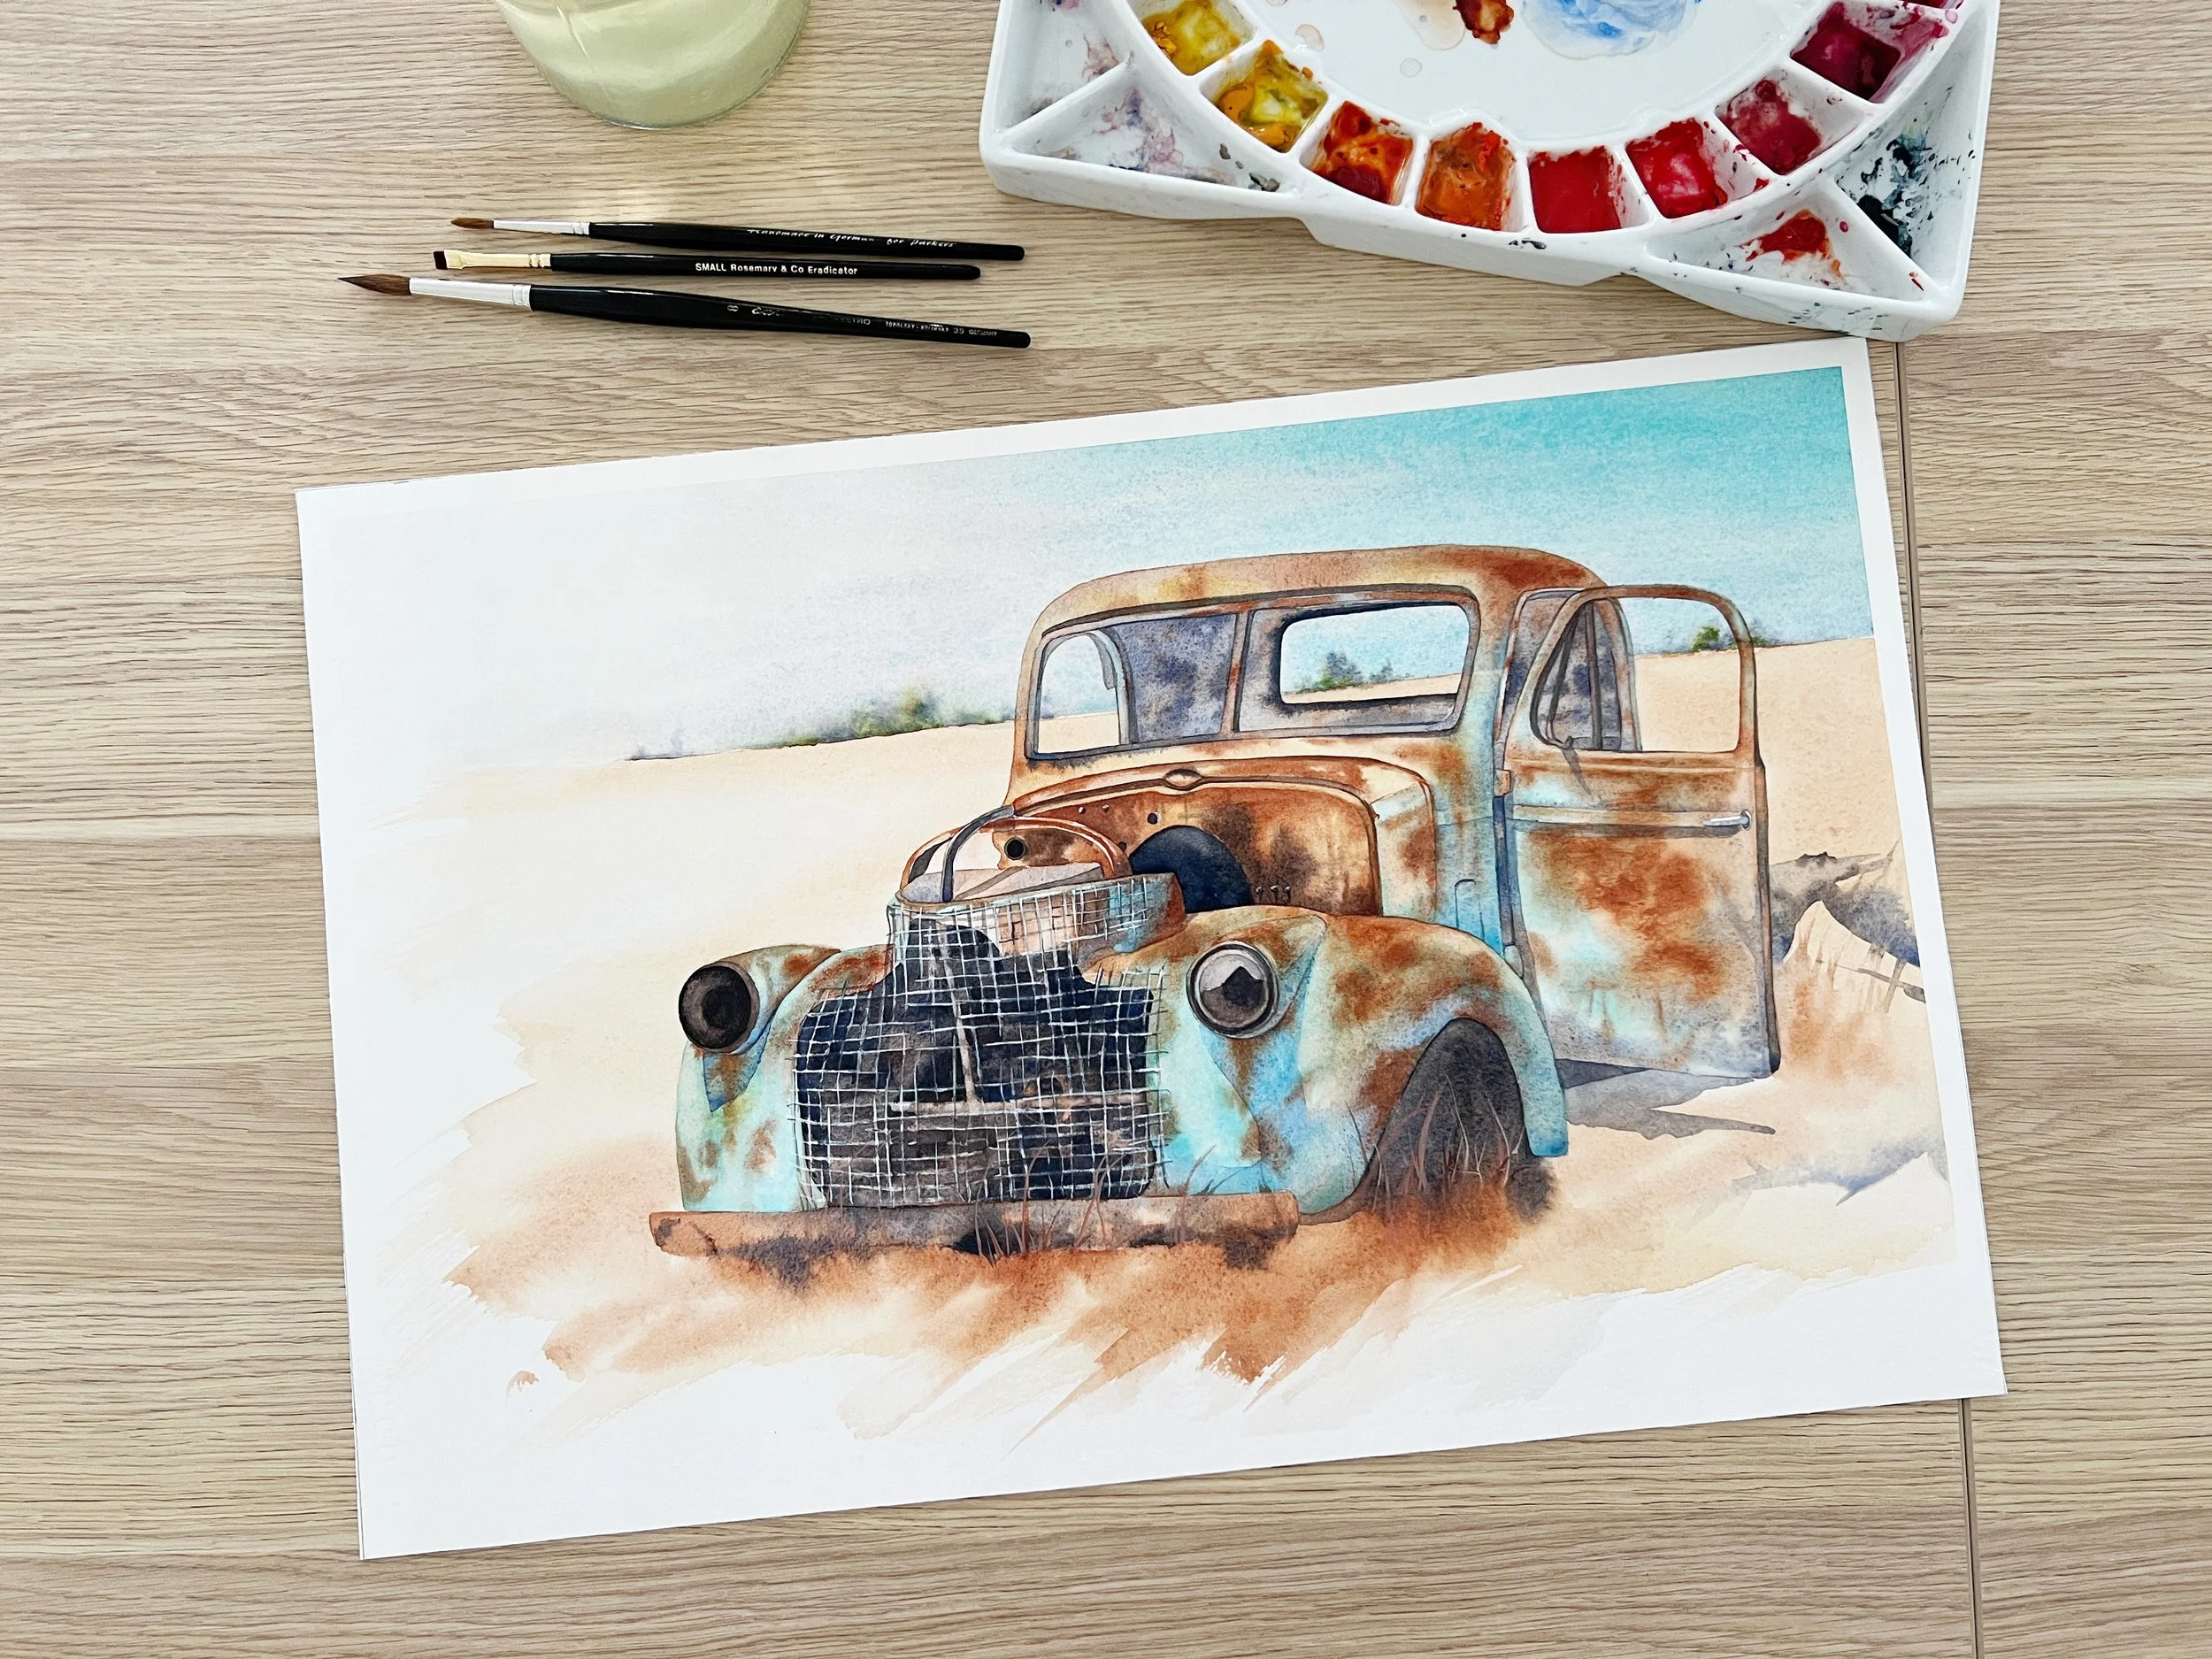
I used the scumbling technique to paint the rusted areas on this old truck
12. Feathering: Softening Edges
Feathering is a technique used to soften the edges of your paint. While the paint is still wet, use a clean, damp brush to gently blend the edges, creating a smooth transition. This method is perfect for creating soft shadows, blending colours, and adding a sense of realism to your work. Feathering helps integrate different elements of your painting, making them feel like part of a cohesive whole.

Here I am softening a paint edge on dry paper with a clean, damp brush.
13. Alcohol Texture: Unique Patterns
Dropping rubbing alcohol onto wet paint creates interesting and unique patterns as the alcohol repels the pigment. This technique is fantastic for abstract compositions, adding texture, and experimenting with new effects. Try using different concentrations of alcohol for varied results. Alcohol texture can add a fascinating, otherworldly quality to your paintings, making them stand out with unique patterns.
14. Negative Painting: Shaping the Light
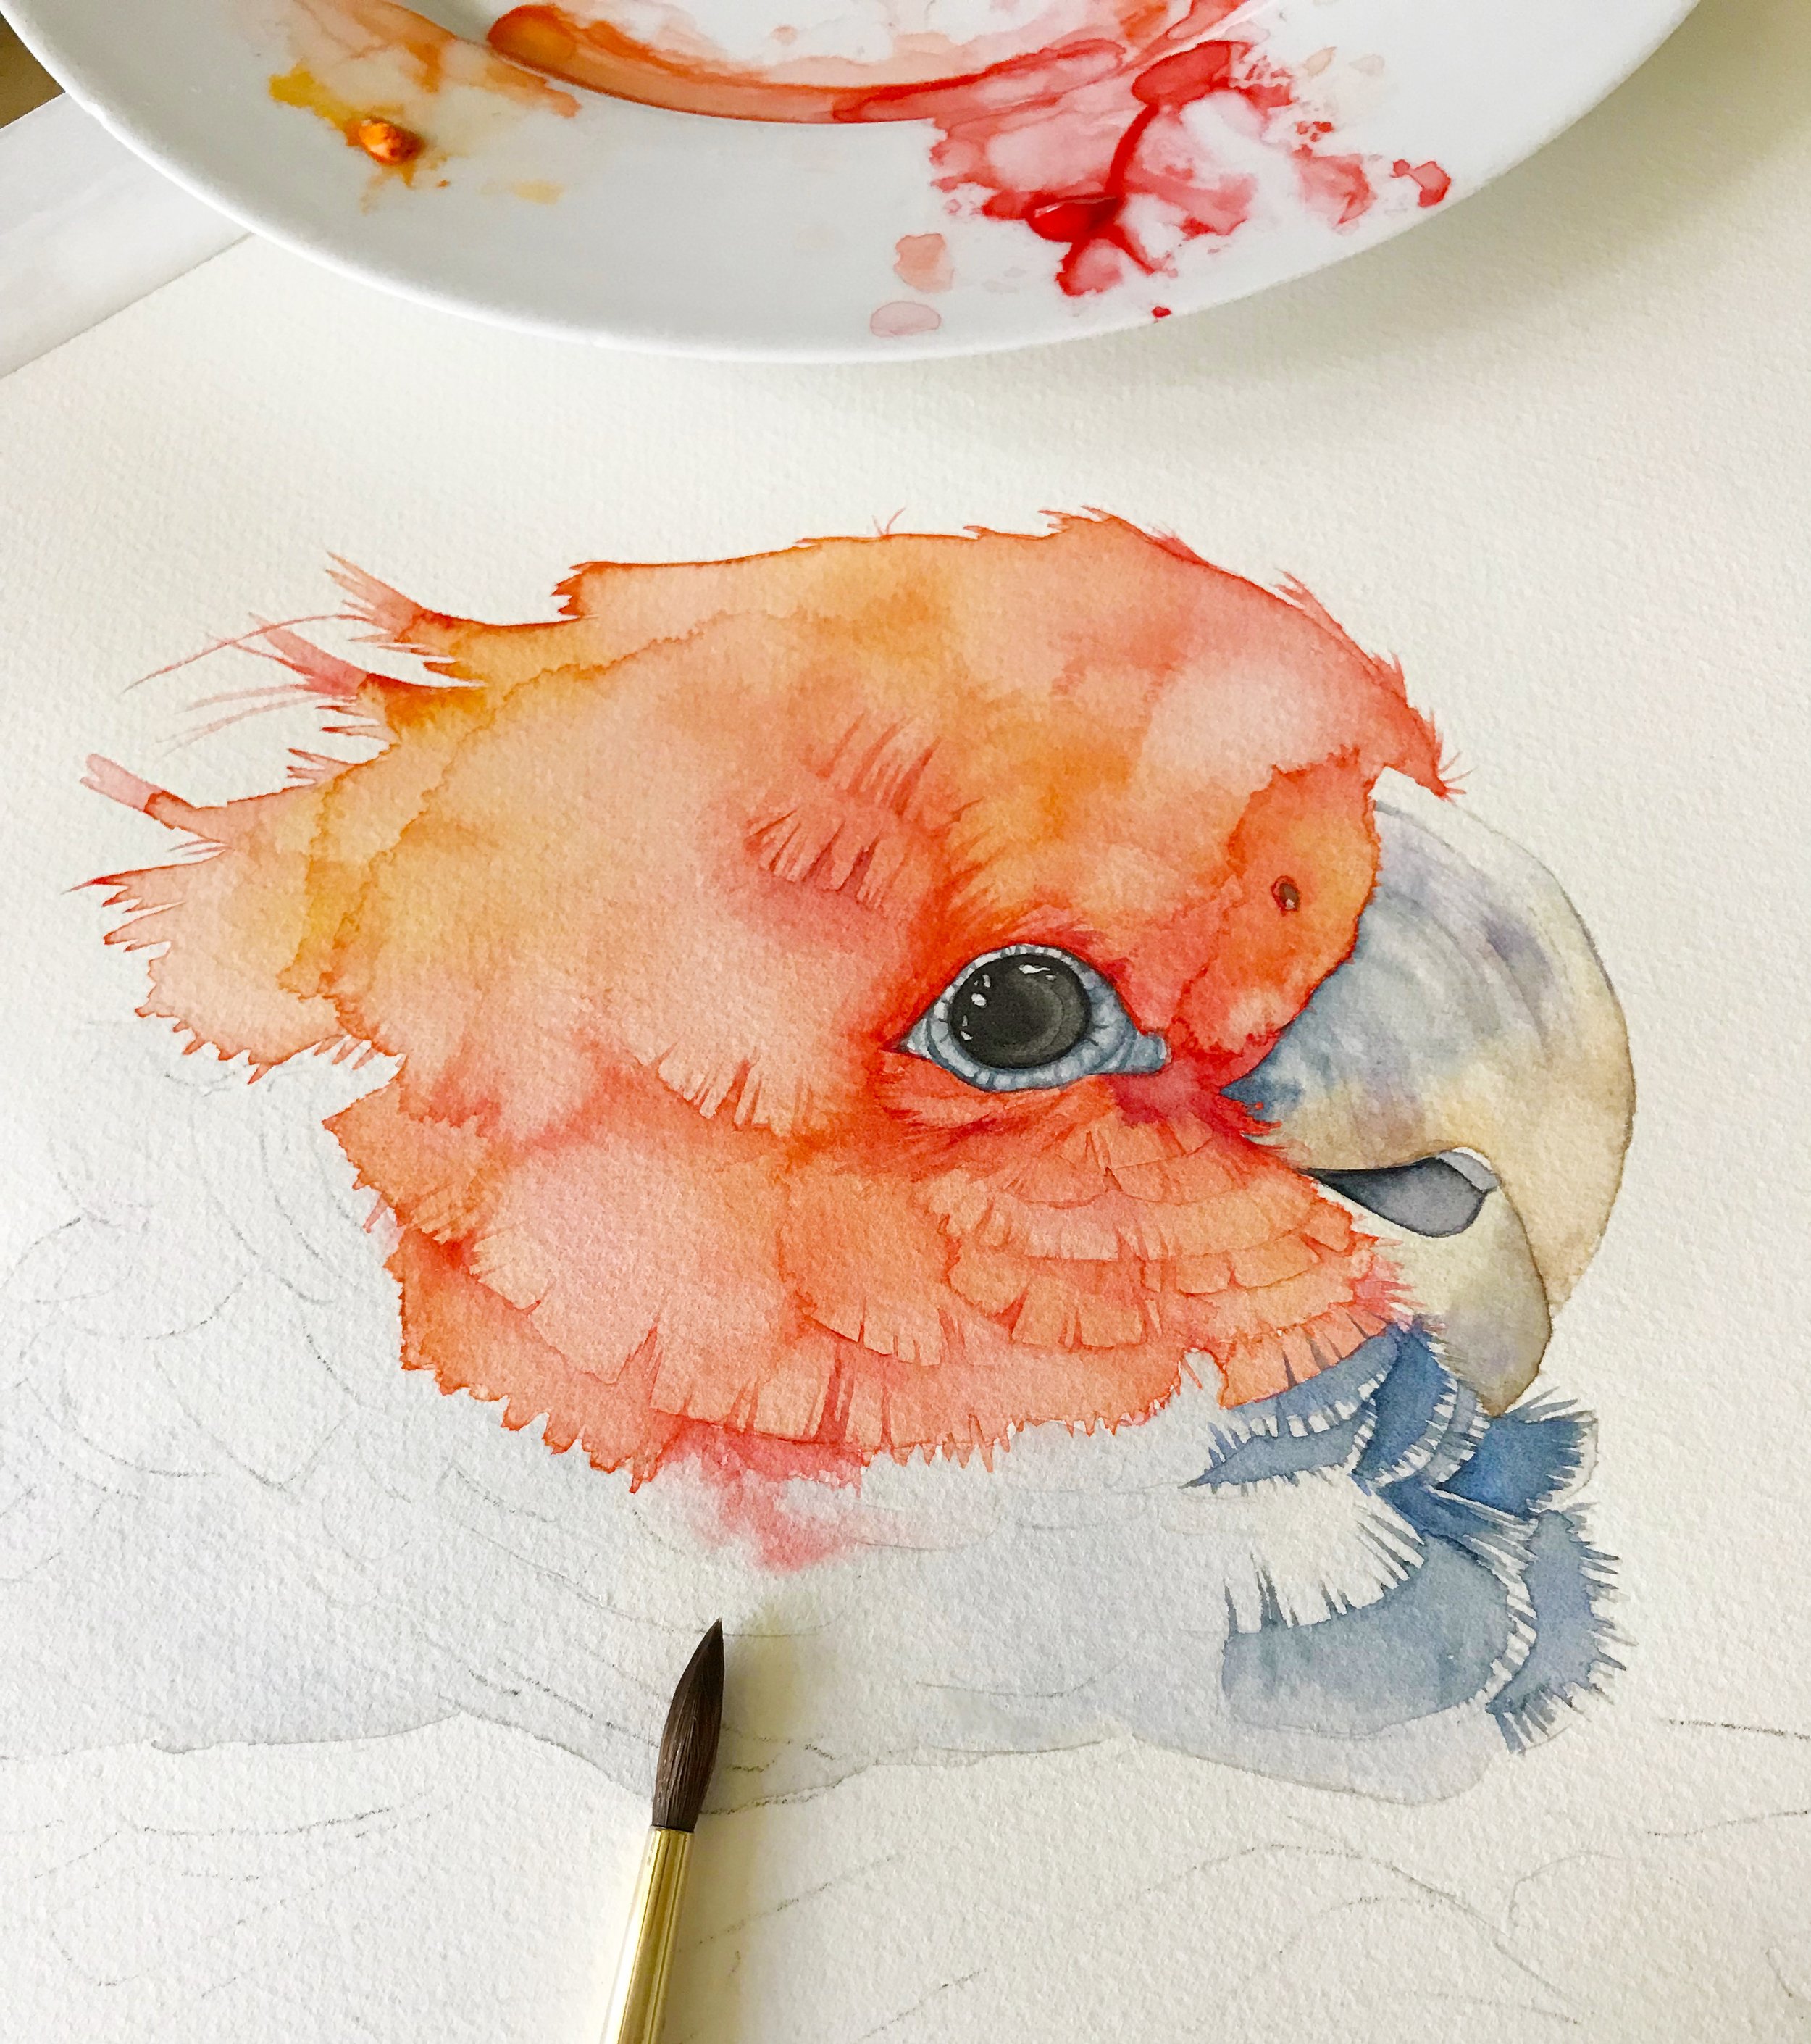
I painted the red feather detail on this Gang Gang Cockatoo negatively. I painted the area around the feathers to create the edges of the feathers.
Negative painting is an intriguing technique that involves painting around the subject to define its shape, rather than painting the subject itself. Start by identifying the areas you want to keep white or lighter, and paint the surrounding areas darker. Always work from light to dark. This method creates a striking contrast and helps to highlight the subject, making it stand out.
To use the negative space negative painting requires careful planning and a good understanding of the composition, but the results can be stunning, adding depth and a three-dimensional effect to your work. It’s particularly effective for creating intricate details in botanical paintings or highlighting delicate subjects like leaves and flowers.
15. Using a Water Bottle: Prepping Your Paper
A simple spray bottle can be a game-changer in your watercolour toolkit. Spritzing your paper with water before applying colour can create beautiful, spontaneous effects. This is especially useful for the wet-on-wet technique, helping the paint to spread and blend organically. You can also use it to re-wet areas of your wet paper that have dried, allowing you to add more layers or blend colours further. Spraying your paper can create soft, atmospheric backgrounds and add a touch of unpredictability to your work, keeping your process fresh and exciting.
16. Adding Highlights
Adding highlights is essential for bringing out details and creating a sense of depth and dimension in your watercolour paintings. You can use white gouache, a white gel pen, or pastel pencils to achieve this effect. Gouache is opaque and can be applied with a brush to add crisp, bright highlights even over dark areas.
A pen offers precision for fine details such as the glint in an eye or delicate light reflections. Pastel pencils provide a soft, blendable highlight, perfect for adding subtle light to textured surfaces or creating a gentle glow. Each of these handy tools can help you accentuate details and make your paintings pop with vibrant highlights.

Adding details and highlights in the final stages of this painting with some white gouache.
17. Wax Resist: Preserving White Paper
Using wax as a resist technique is a fantastic way to preserve the white space of your paper. You can use a white candle or a wax crayon to draw on your paper before applying watercolour. The wax will repel the paint, leaving the areas you covered with wax white.
This technique is perfect for creating intricate patterns, highlights, and textures. It’s especially useful for depicting the glistening effect of snow, the sparkle on water, or the fine details in a botanical piece. The resist effect adds a layer of complexity and interest to your artwork, making it visually intriguing.
18. Ink and Wash (Line and Wash): Adding Detail
The pen and wash technique, also known as line and wash, or ink and wash, combines the precision of ink lines with the softness of watercolour washes. Start by drawing your subject with waterproof ink. Once the ink is dry, apply watercolour washes over the top.
This technique is fantastic for urban sketching, architectural illustrations, and detailed botanical studies. The ink provides structure and detail, while the watercolour adds depth, colour, and a sense of spontaneity. The contrast between the defined lines and the fluid washes creates a dynamic and engaging effect.
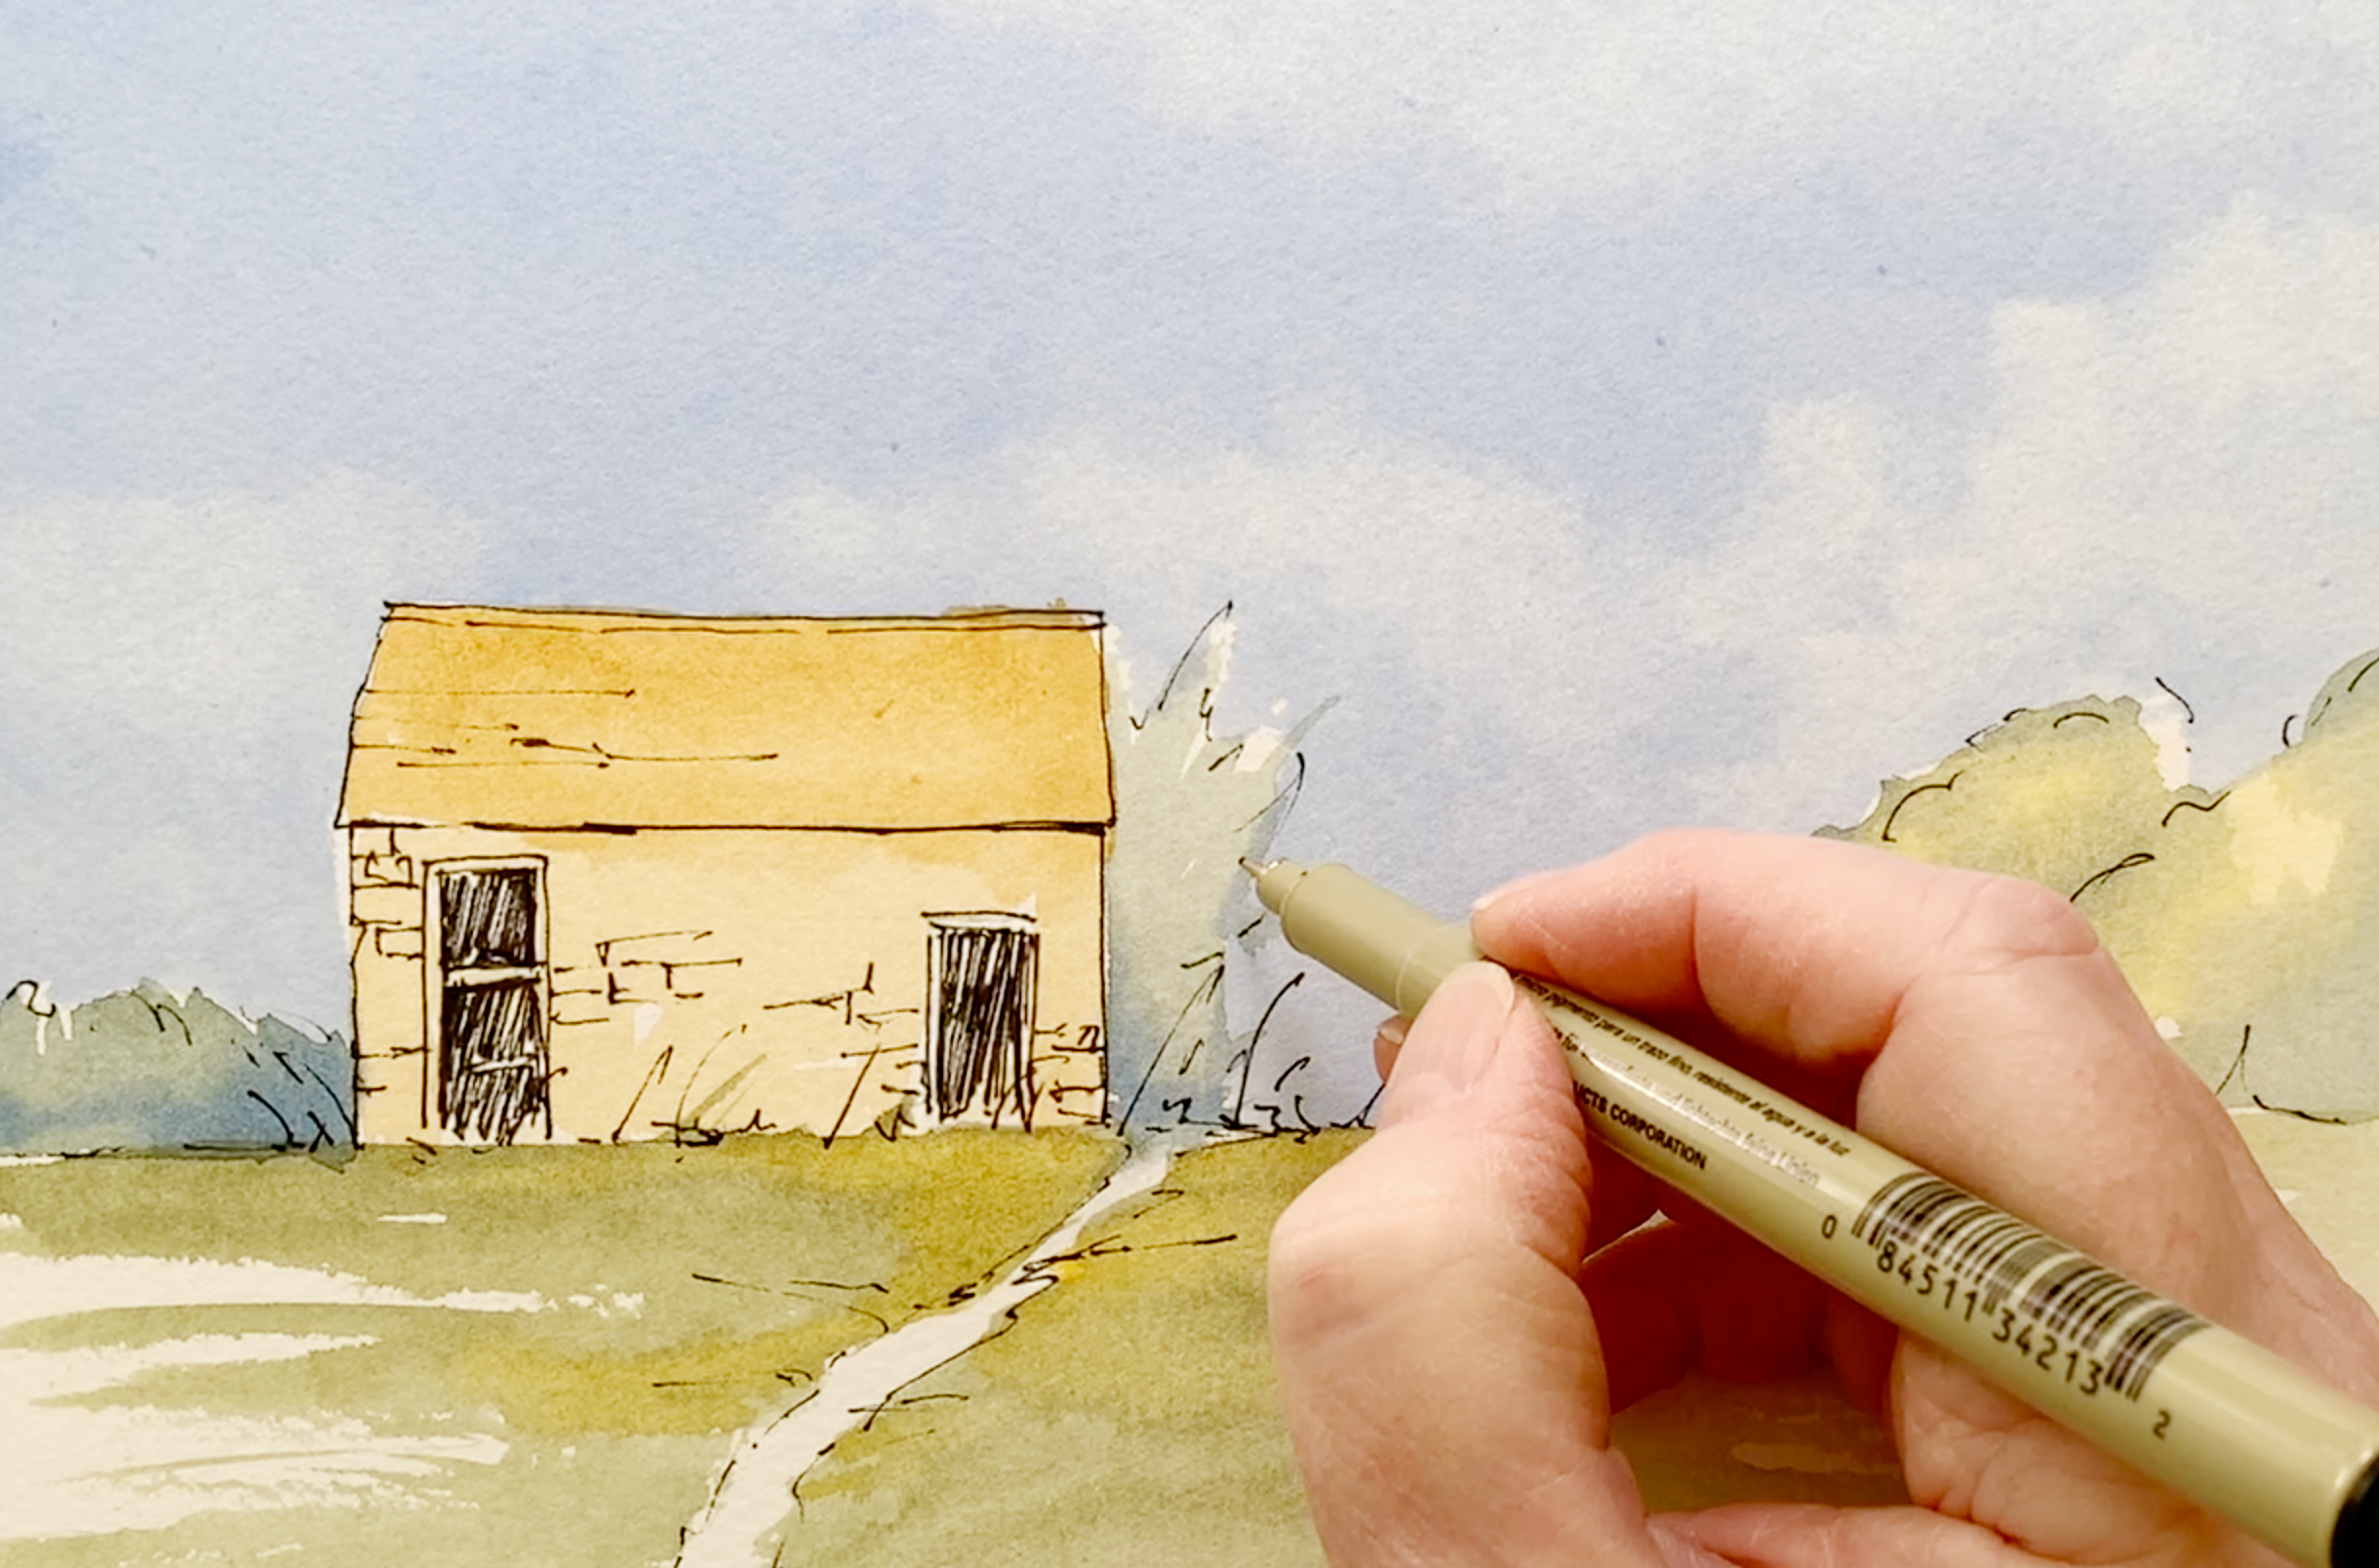
A simple pen and wash landscape - this is a tutorial of mine.
19. Sgraffito: Creating Texture
Sgraffito is a technique where you scratch into the wet paint with a sharp tool to create texture and intricate lines. This method is perfect for adding fine details such as grass, hair, or the veins on a leaf. Use a palette knife, the end of a brush, or even a credit card to carefully scratch into the paint. This scraping technique adds an extra layer of detail and can make your paintings more dynamic and textural.
I used a sharp knife to scratch into the surface of this watercolour painting to create the fine hair. This is painted on Aquabord so I waited until the paint was dry.

Sleeping baby watercolour completed painting
20. Pouring: Abstract Effects
Pouring involves mixing your watercolour paint with water and pouring it directly onto the paper. This technique creates fluid, abstract patterns that are perfect for backgrounds or abstract art pieces. Tilt the paper to control the flow of the paint, allowing it to blend and create beautiful, organic shapes. Pouring can be unpredictable, but it often results in stunning, unique effects that are hard to achieve with a brush alone.
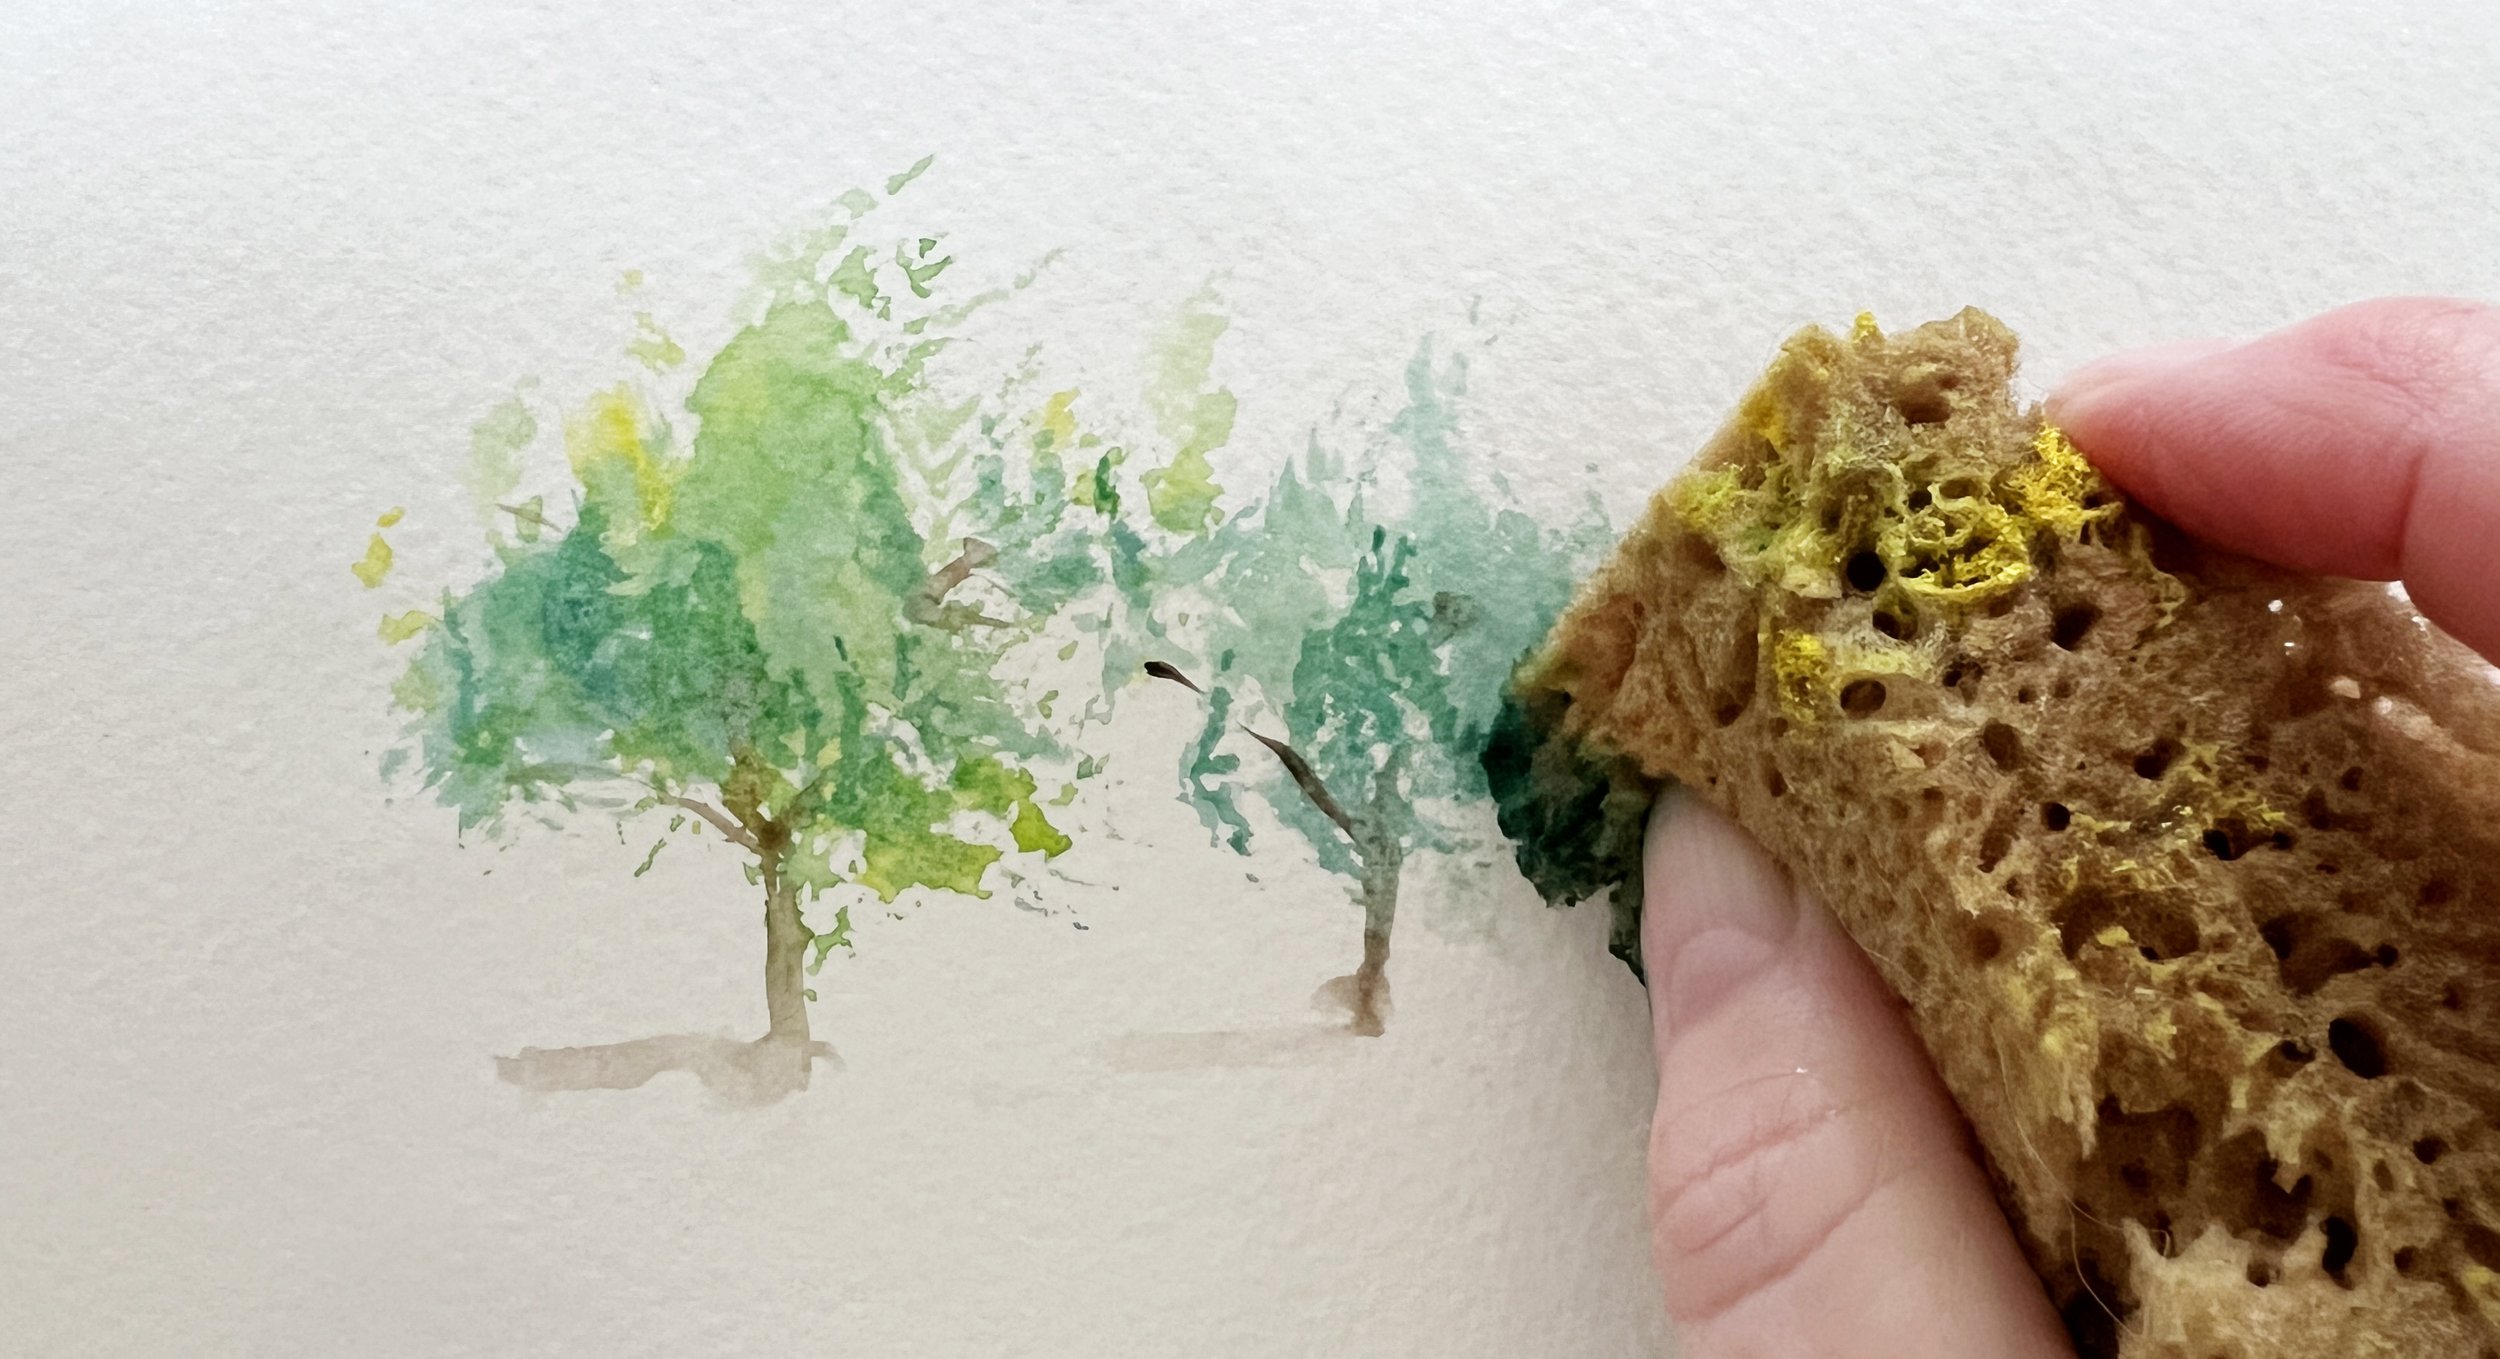
21. Sponging: Textured Effects
Using a natural sponge to apply or lift paint can create an interesting texture. Dab the sponge into the paint and then onto the paper to create a stippled effect, which is great for foliage, clouds, and textured surfaces. You can also use a damp sponge to lift paint, creating highlights or correcting mistakes. Sponging adds a unique, tactile quality to your artwork.
22. Dabbing: Soft Textures
Dabbing with a cloth or tissue is an effective way to create soft, textured effects. Use this technique to lift wet paint gently, creating clouds, mist, or reflections. Dabbing can also be used to soften edges and blend colours, adding a dreamy, atmospheric quality to your paintings.
23. Dropping In Colour: Vibrant Effects
Dropping concentrated colour also known as 'charging' into a wet wash can create vibrant, spontaneous effects. Load your brush with pigment and touch it to a wet area of your painting, allowing the colour to spread and blend naturally. This technique is perfect for adding depth and interest to skies, water, and abstract backgrounds. Dropping in colour with a loaded brush adds a burst of vibrancy and can make your paintings more dynamic and lively.
I love using this technique to observe how the paint mixes directly on the watercolour paper. I use it in almost all of my paintings!
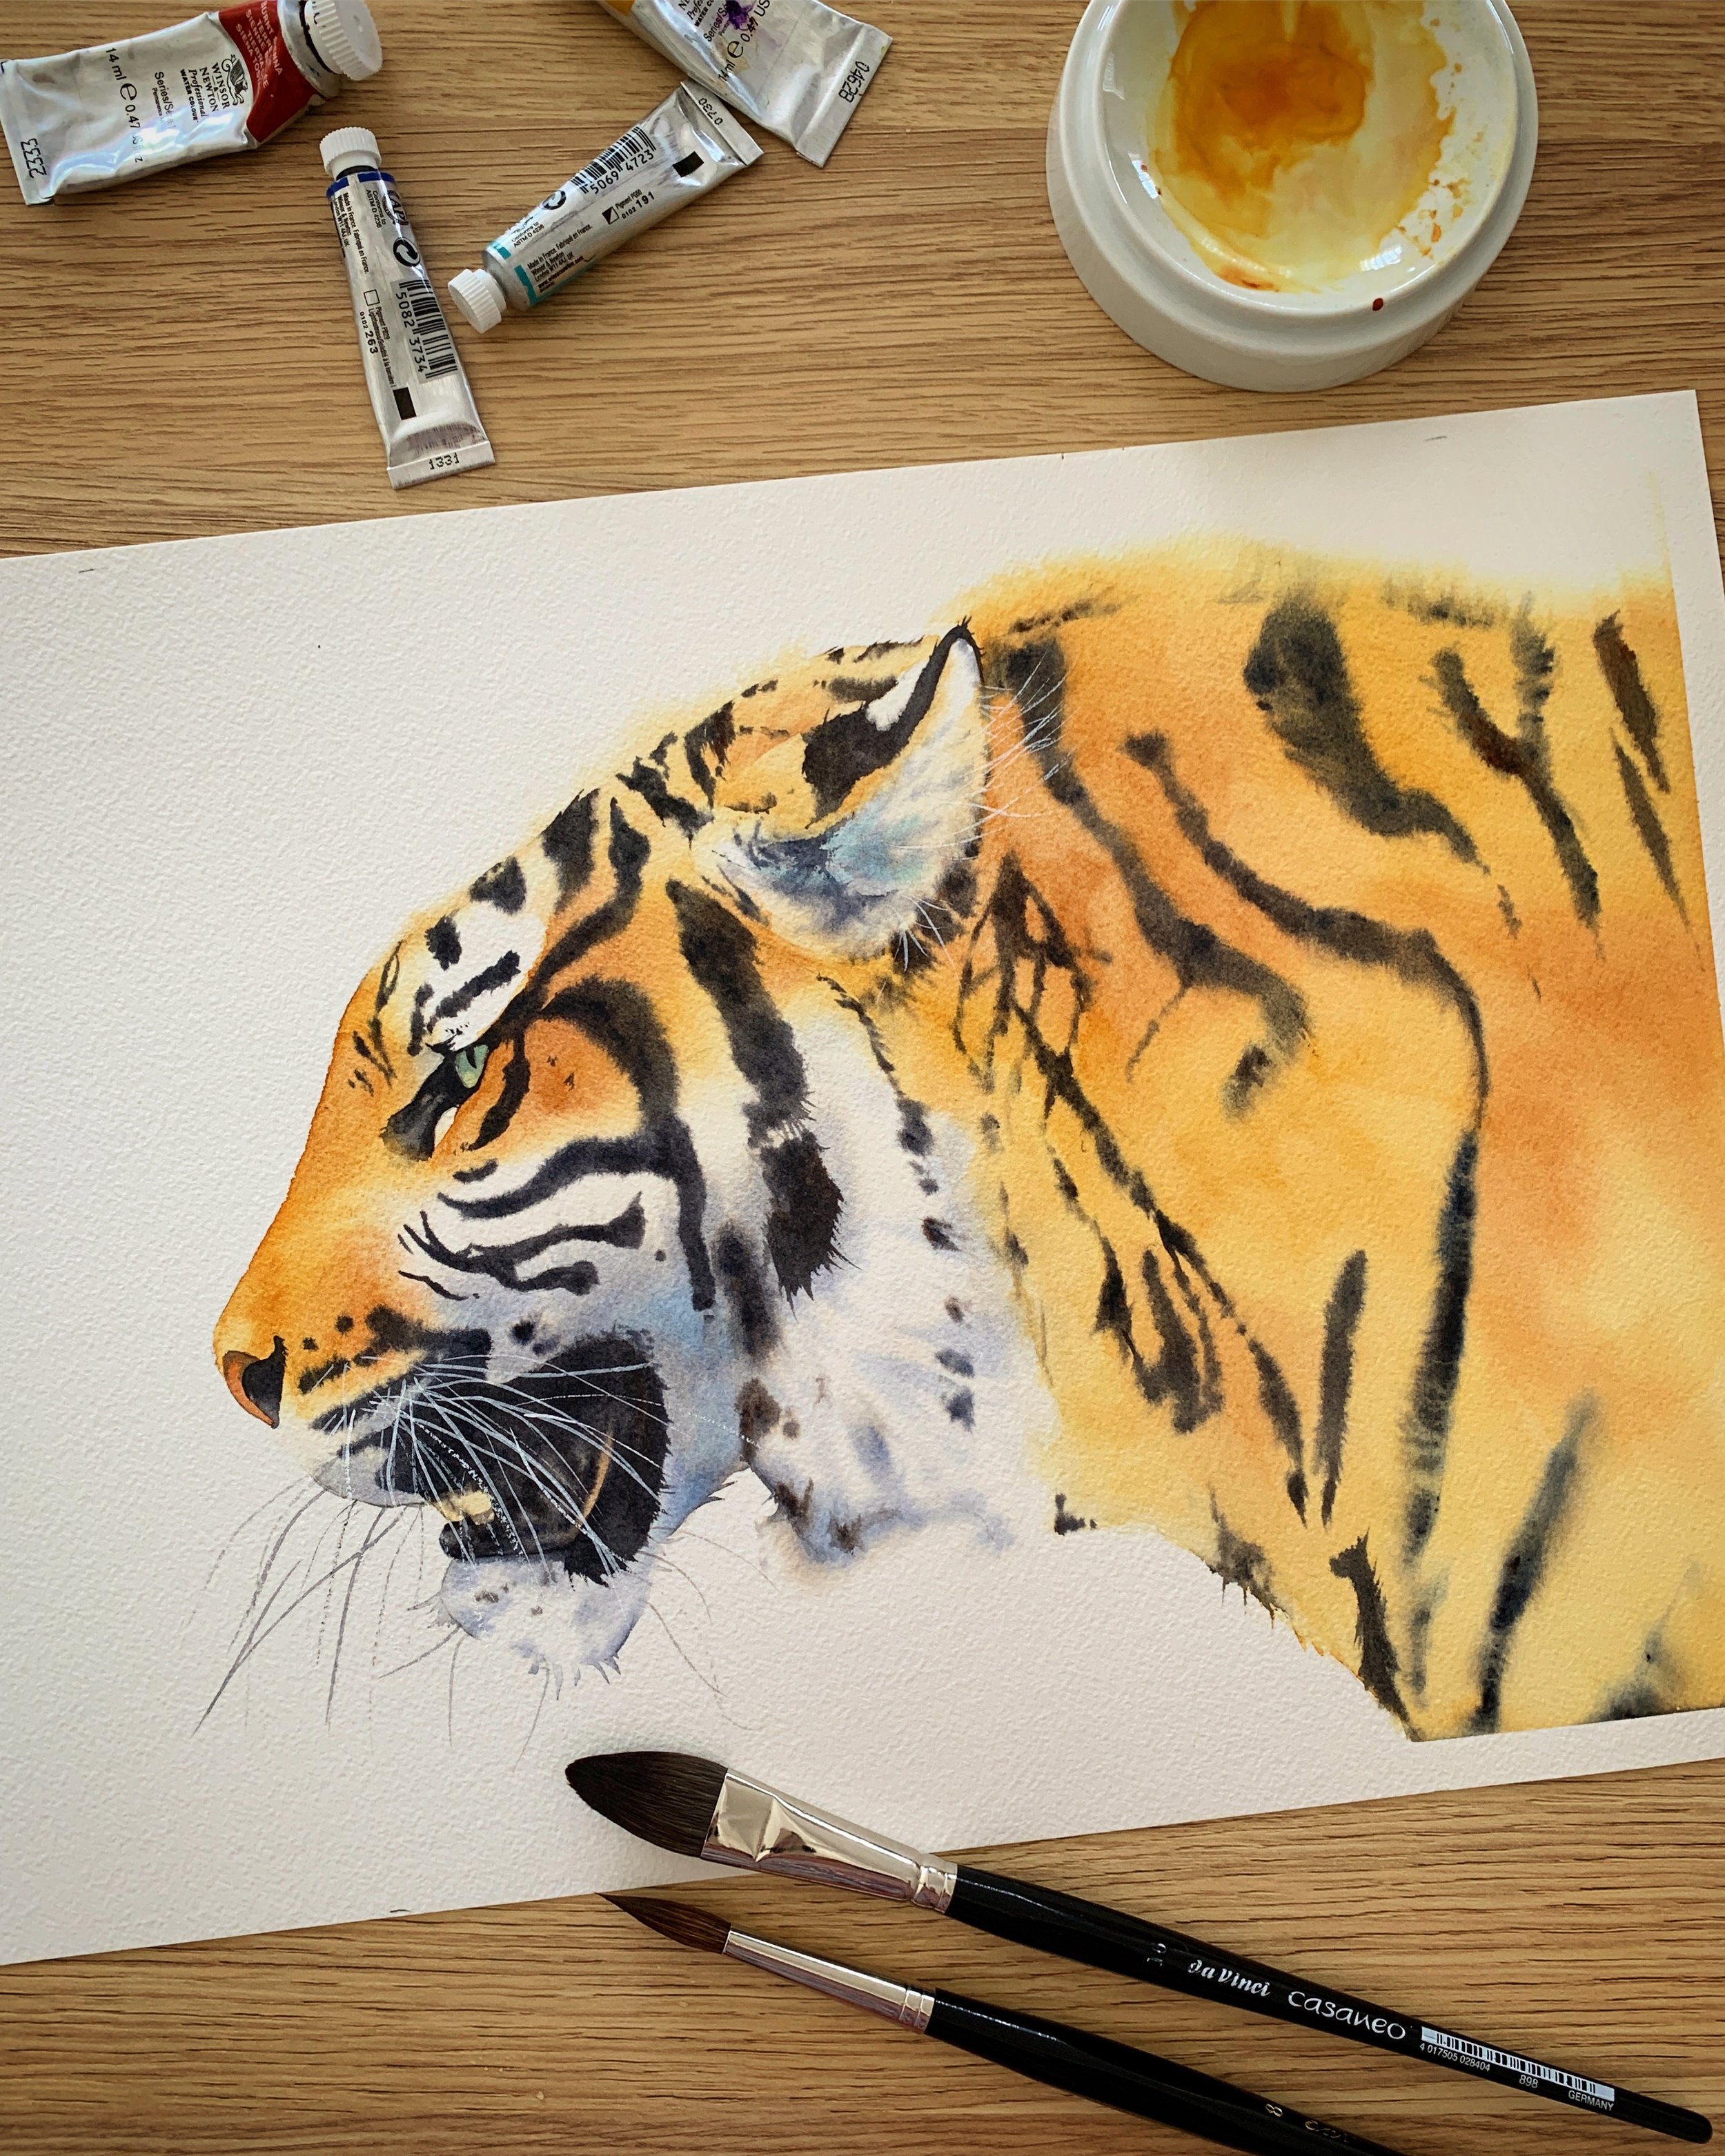
I dropped in some turquoise into the grey areas while they were wet on this tiger painting.
24. Underpainting: Setting the Tone
Underpainting is a technique where you create a base layer of paint to establish the tonal values and overall colour scheme before adding details. Start with a light wash of a single colour to map out the lights and darks in your composition.
This technique helps to create depth and cohesion in your painting, as the underlying colour will subtly influence the subsequent layers. Underpainting is particularly useful for complex compositions where maintaining a consistent light source and mood is crucial.
25. Watercolour Pencils: Versatile Detailing
Watercolour pencils combine the control of coloured pencils with the fluidity of watercolour. You can draw detailed lines and then apply water with a brush to create soft washes and blend colours. This technique is perfect for adding fine details and textures to your watercolour paintings. You can use the pencils dry for precision, then wet them to integrate the effects seamlessly into your work. This method is ideal for mixed-media pieces and for artists who want to combine the benefits of drawing and painting in one medium.
Marks made with watercolour pencils can be activated with water.
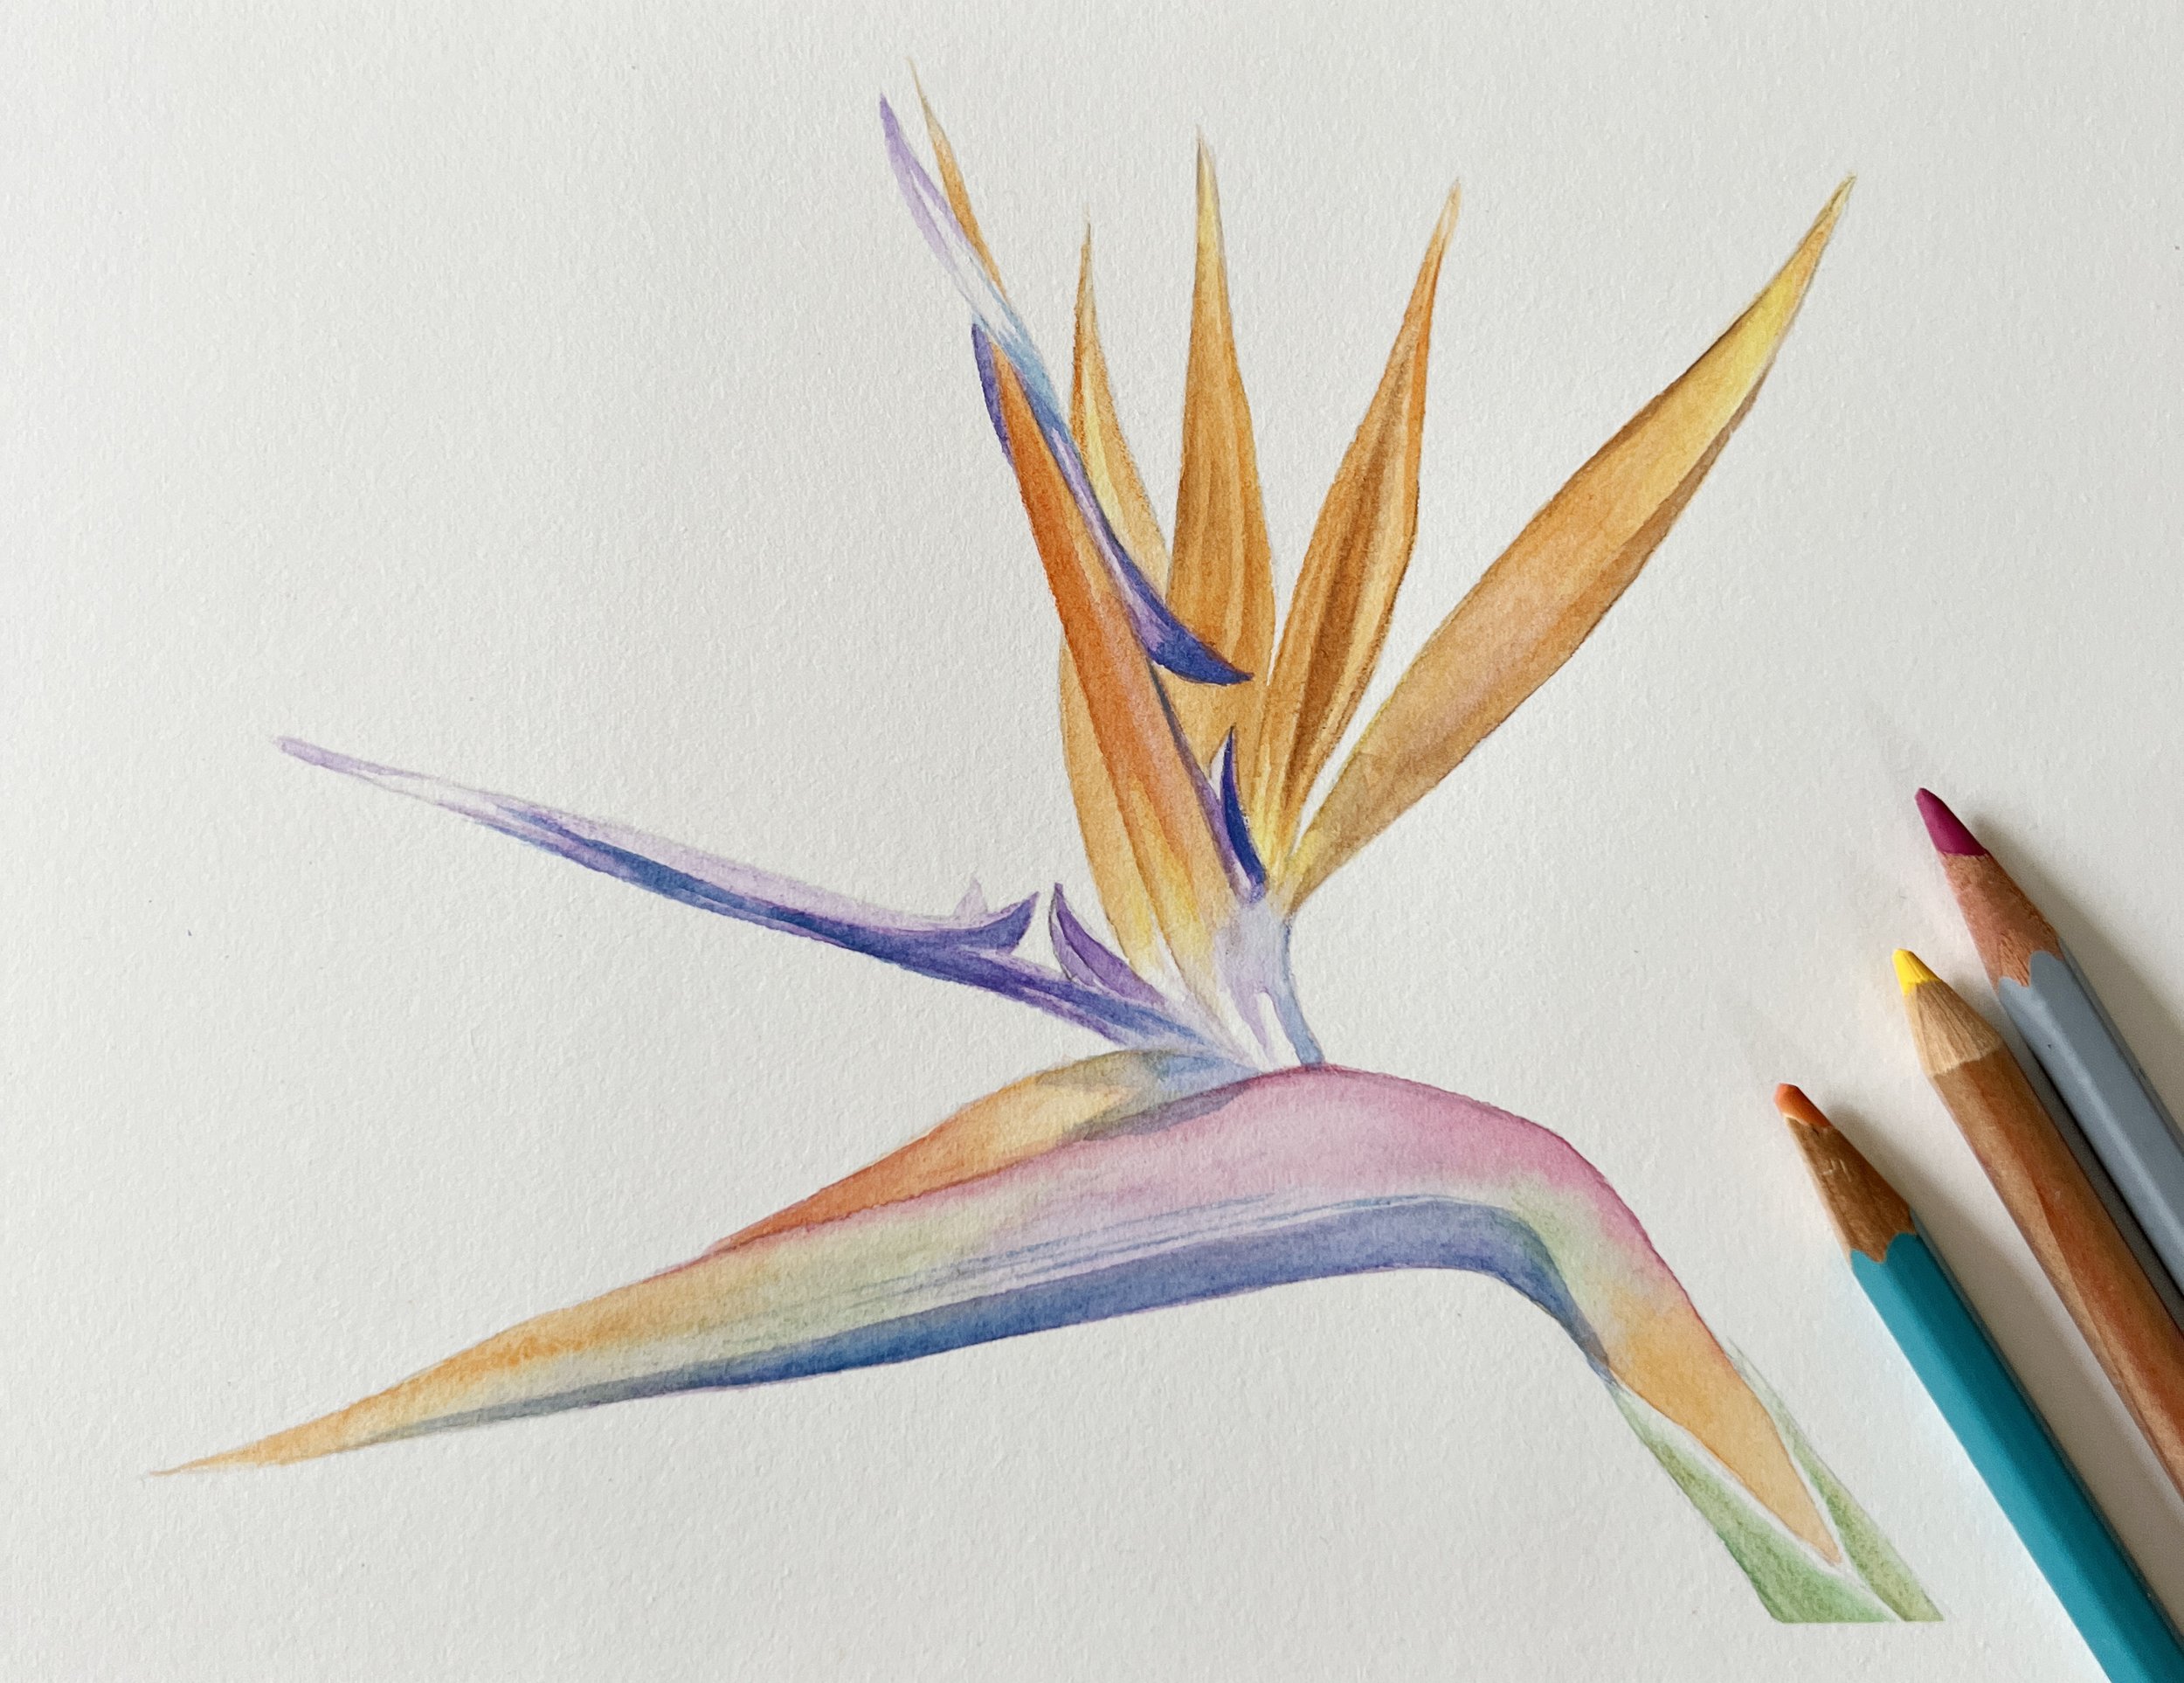
Bird of Paradise flower painted with watercolour pencils and a brush.
Choosing the Right Watercolour Paper
The type of paper you use can greatly affect your watercolour results. For techniques like wet-on-wet and gradient washes, a heavier paper (300gsm or higher) is recommended as it can hold more water without warping. Cold-pressed paper has a slight texture, making it versatile for both detailed work and expressive washes.
Hot-pressed paper is smoother, ideal for fine details and techniques requiring precision, like wet-on-dry and glazing. Rough paper, with its pronounced texture, is fantastic for dry brush techniques and adding natural, rugged textures. Understanding the properties of different papers will help you select the right one for your specific technique, to create interesting textures and to achieve your desired outcome.
Achieving Clean Edges: Crisp and Defined
Achieving clean edges in your watercolour paintings can enhance the clarity and precision of your work. Techniques like wet-on-dry, masking, and the use of a fine-tipped brush are essential for creating sharp, defined edges. Wet-on-dry allows for controlled application of paint, ensuring that colours don't bleed into each other. Masking fluid or tape can protect areas you want to keep untouched by paint, creating crisp boundaries once removed. Additionally, a fine-tipped brush helps you outline and define shapes with precision. Clean edges are particularly important in detailed illustrations, botanical art, and architectural paintings, where clarity and accuracy are key.
Mastering these 25 watercolour techniques will open up a world of possibilities in your artistic journey. Each technique offers unique effects and can be combined to create stunning, multifaceted artworks. Remember, practice is key, so don’t be afraid to experiment and find your own style.
Happy painting! 🎨🖌️🌈
Until next time,
Louise
If you are interested in learning to paint in watercolour, I have over 170 online, voiced over watercolour tutorials for all skill levels.